In the past year or two cryptocurrencies have exploded in popularity with currencies like Bitcoin and Ethereum leading the way. Many have reached multi-billion dollar market caps, and Bitcoin’s has surpassed the trillion dollar mark more than once.
With this surge in price, cryptocurrency mining became a much more attractive prospect and mining rewards were able to sustain much higher network hashing power and more miners. Demand for GPUs and other mining hardware skyrocketed (hence the ongoing GPU shortage), and the number of small-scale miners grew exponentially.
The market has since corrected a bit, but cryptocurrency mining is still in full swing and plenty profitable if you know what to mine and have the right hardware to do so. As such, we created this guide to guide you through the entire process of crypto-mining.
This includes addressing the various types of mining hardware, the different strategies for varying levels of risk tolerance, choosing a coin to mine, downloading and configuring mining software, and more.
In short, our goal is that this article serve as a standalone guide that teaches you everything you need to know to mine whatever cryptocurrency you choose. Instead of saying “set up the mining software” or “mine the most profitable coin,” we’ll show you how to do these things yourself. Let’s get into it.
What is Cryptocurrency Mining?
It’s important, although not essential, to understand the purpose and function of crypto mining. In actuality, earning rewards is not the primary purpose of mining, but rather an incentive to do so.
In its most basic form, cryptocurrency mining means contributing your computing power to help the blockchain reach consensus. In other words, you’re helping to verify that all transactions on the blockchain are legitimate. This is essential, since without consensus foul play would be rampant; users could edit the blockchain to reflect an illegitimate balance in their wallet or spend the same crypto more than once.
There are many different consensus mechanisms, but Proof of Work is by far the most common. When you think of cryptocurrency mining you’re probably thinking of Proof of Work (POW) mining; Bitcoin and Ethereum both use POW algorithms.
With Proof of Work users’ machine(s) generate large numbers of hashes (or guesses) in an attempt to get the closest to the “target hash.” The user whose hash is closest to the target hash wins the block rewards.
Types of Mining by Hardware
Cryptocurrency can be mined using many different kinds of hardware; the type required depends on the specific cryptocurrency’s mining algorithm. In this section we’ll look at the most common types of mining and discuss the benefits and downsides of each.
GPU Mining
GPU mining is by far the most widespread method among small-scale miners, as many PC owners already have access to graphics cards that house capable GPUs. GPU mining isn’t only limited to graphics cards, though. Dedicated mining cards with no graphics capabilities such as Nvidia’s CMP HX line can also be used to equal effect.
Mining with a GPU is a great option because if you already own one, you can turn an instant profit since you aren’t sinking any money into new hardware. They aren’t as powerful as ASICs (which we’ll cover in a second), so they’re best used to mine ASIC-resistant coins (since otherwise network difficulty will be dominated by ASICs).
CPU Mining
CPUs have by and large been overtaken by GPUs in the mining world but they’re not entirely obsolete; you just have to look to less mainstream coins. Some algorithms such as GhostRider and RandomX were designed specifically with CPUs in mind, meaning CPUs are actually ideal for mining coins that utilize them and can offer the same or better price-to-hashing-power ratio than GPUs.
While CPU mining has traditionally been less profitable than GPU mining, it’s taken off in the past year with projects like Raptoreum and Monero. Not every PC is equipped with a powerful GPU, but almost any rig can be used to CPU mine, so if you’re looking to get your foot in the door CPU mining might be your best option when starting out.
Hard Drive Mining
Mining with storage space, known as Proof of Space and Time (or Proof of Space in some algorithms), is a fairly new development that debuted with the release of Chia in 2021. While HDD mining may sound like it has the lowest barrier to entry of all hardware types, it’s actually quite difficult to turn any sort of profit doing so.
This is because netspace for most Proof of Space projects like Chia and Chives has grown at a massive rate, meaning you’ll need to buy hundreds or even thousands of dollars worth of hard drives to generate any meaningful revenue. Even an 8TB hard drive (which is more than most PC owners have) will hardly make a dent.
Moreover, to “mine” with hard drives you’ll need to create “plots” with most projects. These take a long time to create and can significantly shorten the writing drives’ lifespan. Because of this, we highly recommend staying away from storage mining if you’re a beginner or, at the very least, only using drives that you already own.
ASIC Mining
Last but not least, we have ASIC mining. ASICs (or Application Specific Integrated Circuits) are machines created for the sole purpose of mining cryptocurrency. They’re usually built to mine only one algorithm, so a Bitcoin ASIC can’t mine Dogecoin (these coins use different algorithms).
This means that an ASIC’s value is heavily tied to the profitability of cryptocurrencies it can mine. Whereas a graphics card is still useful for gaming or machine learning if mining is no longer profitable, an equivalent ASIC will retain far less value. Thus, ASICs are inherently riskier.
These machines also tend to be incredibly expensive unless they’re outdated to the point of irrelevancy. For instance, the Bitmain Antminer S19 Pro, one of the most popular Bitcoin ASICs, usually costs upwards of $10,000. These lofty barriers to entry mean ASICs are almost exclusively reserved for large-scale miners that own dedicated mining facilities with dirt-cheap electricity (since ASICs are notoriously power-hungry).
Why You Shouldn’t Mine Bitcoin
The majority of folks looking to mine cryptocurrency want to mine Bitcoin in specific, however for most people this is a fairly terrible idea in practice. This is because Bitcoin’s network has been taken over entirely by ASICs; unless you have one mining is out of the picture. Even if you were to purchase an ASIC, time to break even is currently around 2 years, and that’s if you manage to find a good deal.
For this reason it’s the unfortunate truth that you should stay away from mining Bitcoin. Ethereum is currently the king of cryptocurrencies if you don’t own an ASIC, and you’re probably best off mining it or another project that isn’t ASIC-dominated.
Speculative vs. Non-Speculative Mining and Risk Management
Cryptocurrency mining can be broken down into two types: Speculative and non-speculative. It is technically true that all crypto mining is speculative to some degree; you’re footing the bill for electricity and trusting that your mined assets won’t depreciate to less than the cost of your electricity before you can cash out.
Still, risk can be largely minimized by mining only reputable coins or taking profits as soon as possible, while potential profits can be maximized by doing the opposite.
Any time you mine and hold a cryptocurrency for an extended period of time in the hopes of price appreciation, it essentially becomes an investment. If you mine $100 worth of Ethereum and opt not to sell it, you’re risking 100 bucks of guaranteed fiat. If you chose to sell you’d be guaranteed your profits, but if you hold you have a chance to gain (or lose) value.
If you’re risk-averse and want guaranteed profits the best way of ensuring this is to liquidate your mined cryptocurrency as soon as it’s paid out to you. This will limit your upside, but it will hedge equally against loss.
In the same way, miners can speculate by mining smaller-cap cryptocurrencies with a lot of room to grow. Projects that haven’t been “discovered” yet have far lower network difficulties and are earlier along the emission curve, meaning more rewards for you. If the project does well these rewards will be worth much more than those mining a lower-upside crypto with a proven track record.
Unfortunately, this typically doesn’t play out in favor of the miner. Small projects almost always fizzle out, and finding a successful project to mine early is like finding the metaphorical needle in a haystack: not impossible, but close to it.
For this reason, we highly recommend mining whatever cryptocurrency is the most profitable at the time, or something close to it. If for no other reason, you’re usually better off mining the most profitable cryptocurrency and converting it into your desired asset unless transaction fees are significant.
How to Pick a Coin to Mine
Before you start mining you’ll need to pick a coin. Doing so will help you choose your mining software, since your selection will be contingent on your chosen coin’s algorithm.
Picking a GPU-Mineable Coin
If you’re planning on mining with a video card, the easiest way to pick a coin is to use Whattomine. This website aggregates data on most popular graphics cards and gives you a list of the most profitable cryptocurrencies to mine.
To use Whattomine navigate to their GPU page and find your graphics card. For this example we’ll use the RTX 3080 Ti.
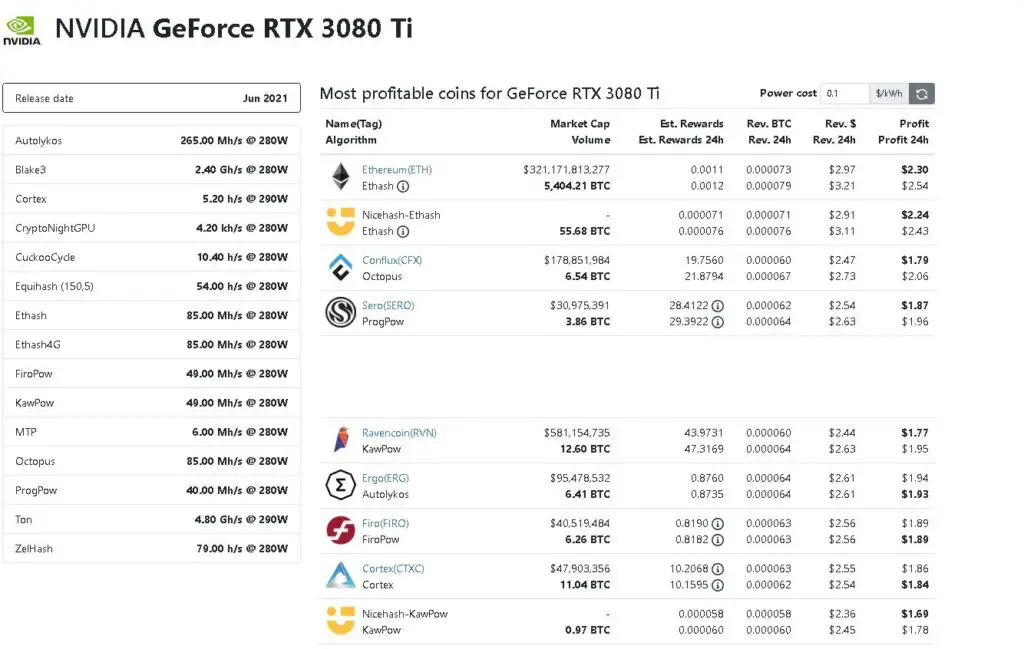
Ethereum is currently the most profitable coin to mine with an RTX 3080 Ti, followed by Conflux and Super Zero. In order to maximize profits, then, you should mine ETH.
It’s almost always the case that Ethereum is the most profitable coin to mine, but this will change soon. Ethereum will move to a Proof of Stake consensus mechanism where mining is no longer used. When this happens the top spot will be taken over by some other currency.
We highly recommend mining Ethereum as long as it’s possible, as this will probably net you the best rewards in the long-term. Ethereum’s popularity also means it’s easier to cash out than more obscure cryptocurrencies like SERO or Ergo, since most exchanges support ETH-to-fiat conversion and withdrawals.
Picking a CPU-Mineable Coin
Finding the best CPU-mineable coin is a bit more difficult, since there’s no resource comparable to Whattomine for CPU mining. In general, Monero and Raptoreum are among the most profitable, but another compelling option is MoneroOcean.
MoneroOcean pays out in Monero (XMR), but it automatically switches algorithms to maximize profits. This makes it one of the best options for beginners looking to CPU mine.
New coins are always coming out, and profitability for any individual crypto can swing wildly. Keeping up with CPU-mining YouTube or Reddit circles can turn up high-upside cryptocurrencies if you’re willing to speculate.
Picking a HDD-Mineable Coin
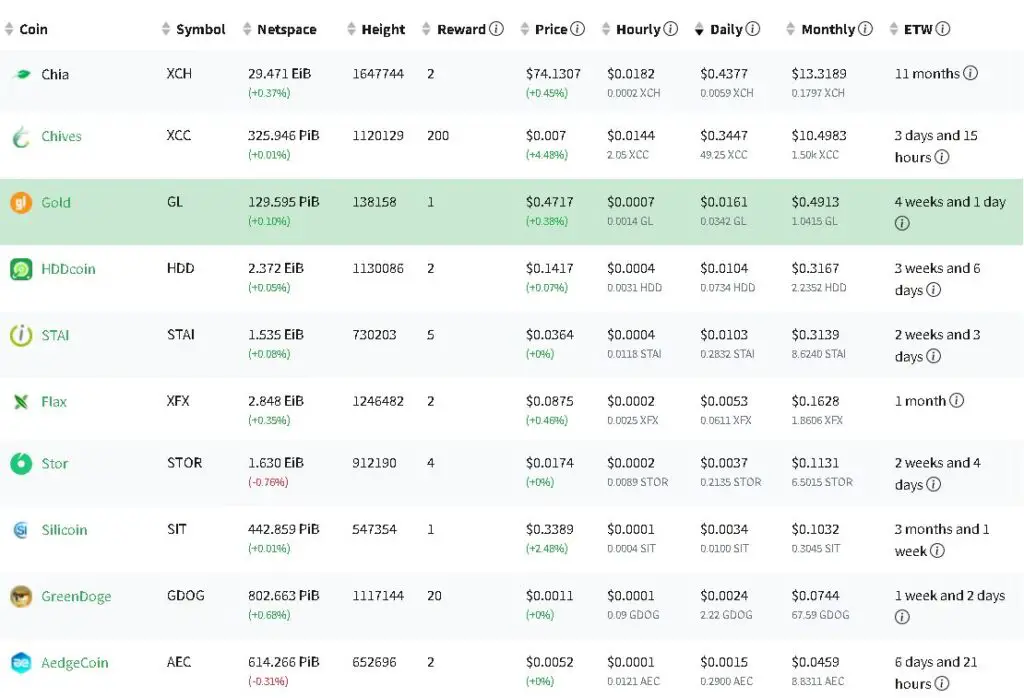
If you’re looking to mine Proof of Space coins, Chia Forks Calculator is your best bet. It displays all of the main Chia forks and displays them in order of profitability. Currently Chia is still your best bet with Chives in second, while the rest are far behind in terms of profitability.
How to Choose and Setup a Wallet
Choosing a Wallet
There are many ways to withdraw your mined cryptocurrency, but for all of these you’ll need a wallet. This can be a custodial wallet with a centralized exchange with Coinbase or Binance, a desktop wallet created by the project’s team (like the Raptoreum Wallet), or an in-browser wallet like MetaMask or Terra Station.
Whichever you choose, you’ll be mining directly to this wallet. As such, it’s important to consider the pros and cons of each:
A custodial wallet will allow you to cash out with the greatest ease. Since most CEXs allow you to convert directly to fiat and withdraw cash to your bank account, cashing out will be easy.
On the other hand, CEXs usually charge transaction and withdrawal fees that eat pretty heavily into your profits. If you have $10 worth of Ethereum and end up paying a dollar to convert to USD and another to withdraw, that’s 20% of your revenue that’s vaporized.
You’ll eventually have to go through one of these if you want to convert your crypto to fiat, but you can also opt to leave it on the blockchain for a while. This is the benefit of using your own wallet; you can interact with dApps and potentially earn more this way.
Setting Up Your Wallet
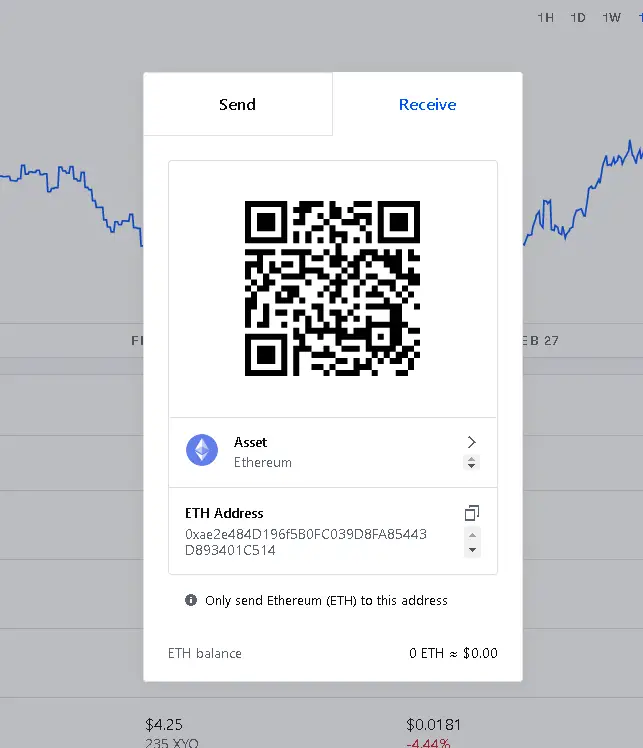
If you decide to withdraw directly to a centralized exchange, simply create an account with them and complete any authentication required. To find your deposit address (which you’ll need later on) you’ll typically click on a “Receive” button somewhere in the UI. For Coinbase, it’s in the top right corner, labeled “Send/Receive.”
From here, navigate to the “Receive” tab and you’ll be given an address. Copy this and write it down somewhere, or just return to this page when you need the deposit address.
Crypto.com, Binance, and most other centralized exchanges have similar interfaces and finding your deposit address should be relatively intuitive.
Non-custodial wallets are a bit different, and your choice of wallet will depend on what cryptocurrency you’re mining. Most projects have their own currency-specific wallet, and it’s almost always linked to from their website. For an example, see SERO’s or Ethereum’s wallet page. These are easily found from the project’s home pages.
When using a non-custodial wallet, download the required software and run the application (or open the Chrome extension). You’ll be given a “secret key,” which is your wallet’s password. Write this down in a safe location and quadruple check that it’s correct. If you lose this information you’ll permanently lose access to all funds in that wallet, with no recourse.
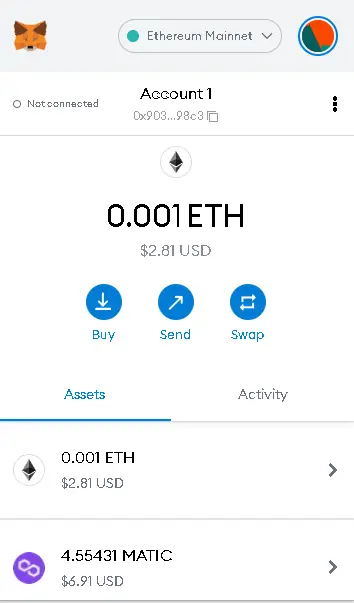
UI layouts for non-custodial wallets vary somewhat, but usually those integrated into your web browser have a button you can click to copy your wallet address. In the case of MetaMask, it’s directly under your wallet name (in the picture below it’s Account 1).
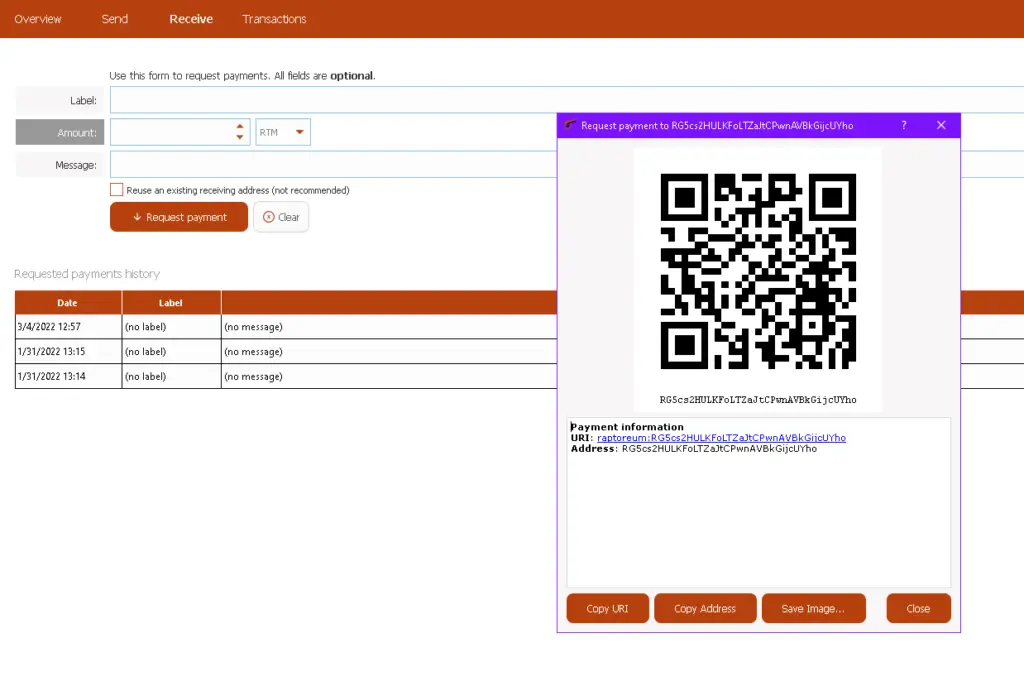
On desktop wallets the layout tends to be pretty consistent: a Receive button with somewhere with obvious prompts leading to the wallet address. For instance, in the Raptoreum Core Wallet you simply select Receive > Request Payment and you’re given an option to Copy Address.
Selecting a Mining Pool
Solo Mining vs Pool Mining
If you’re a small-scale miner your best bet for consistent rewards is joining a pool. Pools are groups of miners that combine their hashing power to eliminate the impact of luck on mining rewards. Mining pools usually charge a small performance fee (1-2% is standard) to cover the costs of development and upkeep, but these fees come out of your mined rewards so you aren’t paying out of pocket.
Unless you have an absolute behemoth of a mining operation running or you’re mining a low-difficulty coin, pool mining is almost always the more lucrative option. Solo mining is comparable to playing the lottery: If you win you win big, but you’re not going to win. For a consistent stream of income always go with pool mining.
How to Find the Right Mining Pool
Now that we’ve established pool mining as the superior choice, how do you go about finding one? The easiest way is via MiningPoolStats, a site that aggregates all of the major pools for most cryptocurrencies. Here’s the current top 10 Ethereum pools:
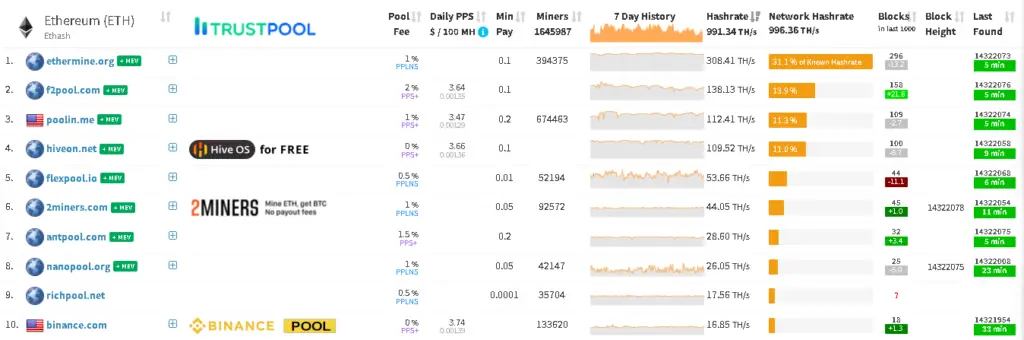
Under Network Hashrate, you can see the percentage each pool makes up of the total network hashrate. More is better, since this ensures the best rewards consistency. Ethermine makes up 31.1% of the total network hashrate so you can expect to win your share of about 1 in every 3 blocks. Hiveon.net, on the other hand, only makes up 11% and will win 1 in every 9 or 10 blocks. For the best reward consistency stick with pools that have at least 5% of the network hashrate.
Pool fees should also play into your choice of pool. Obviously lower fees are better, so Ethermine’s 1% fee is preferable to F2Pool’s 2%, and Hiveon.net’s 0% is the best. Minimum payout (Min Pay on MiningPoolStats) is also important, since this will determine how much you have to mine before you’re paid.
If the minimum payout is .1 ETH and it takes you three months to mine that much, you might be better off opting for a pool with a lower minimum so you can access your profits more quickly.
Another stat that isn’t listed on MiningPoolStats is the availability to withdraw to layer-2 Ethereum chains like Polygon. When you transfer funds on any blockchain you have to pay gas, and Ethereum’s gas fees are inordinately high. When you’re paid out, this transaction fee comes out of your mined cryptocurrency balance.
If you withdraw to a layer-2 blockchain withdrawals are often free or negligible. Since many CEXs support Polygon, you can withdraw directly to one via Polygon and cash out with far lower fees. Ethermine is one such pool that supports L2 withdrawals.
Find Pool Parameters
Once you’ve found a pool, you’ll need to find the server address and port to configure the mining software. This information can usually be found by clicking Start Mining on the pool’s website. The below screen is displayed on Ethermine, after clicking Start Mining in the top right corner:
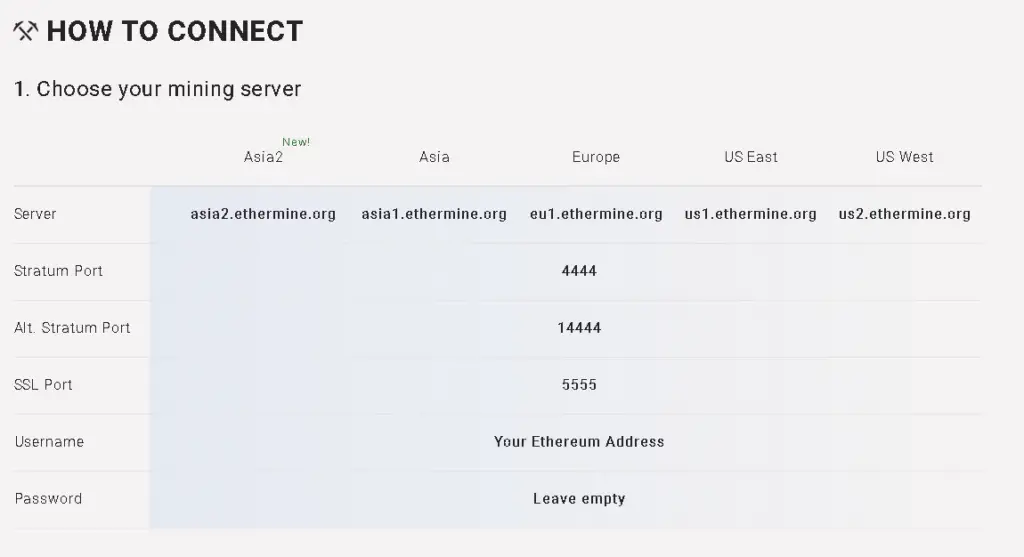
Once you’ve found this information, keep this tab open so you can easily copy and paste the information to your batch file (which we’ll talk about in a second). Choose the server that’s closest to you (so if you’re in New York, US East). The port will usually be 4444 or 5555; 5555 is SSL and is recommended as it’s most secure.
Finding the Right Mining Software
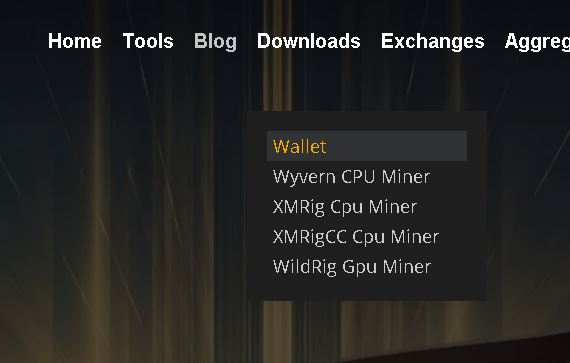
Now that you have a wallet address, it’s time to proceed with setting up your mining software. Finding the right software sometimes takes a little bit of hunting, but it’s not too hard. Many times the project’s website will link to recommended miners, like Raptoreum’s in the image below:
Other times it isn’t quite so easy. If the website doesn’t recommend mining software, MinerStat is an incredible resource for finding one. Search for your coin of choice and navigate to the Miners tab. MinerStat provides a list of compatible mining software along with their supported GPU brands.
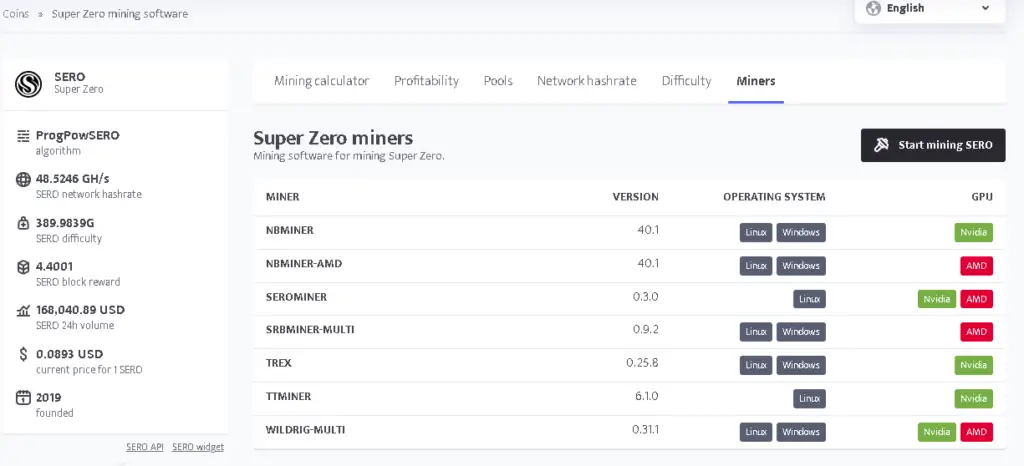
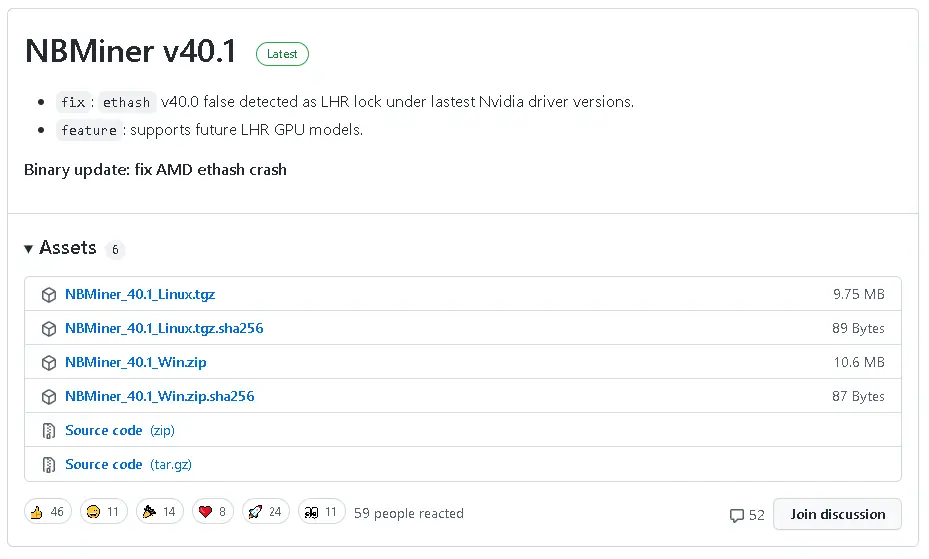
In this instance, it appears as if NBMiner is a good option. A simple Google search for “NBMiner Download” turns up its GitHub page, and from there it’s easy. Select the correct OS (since we’re on Windows in this example it’ll be NBMiner_40.1_Win.zip) and click to download.
Configuring Mining Software
Most miners install as a .zip file. Once the file’s downloaded open it and extract the contents to a folder. We usually put this folder on the Desktop for easy access, but you can put it anywhere as long as it’s in an easy-to-find location.
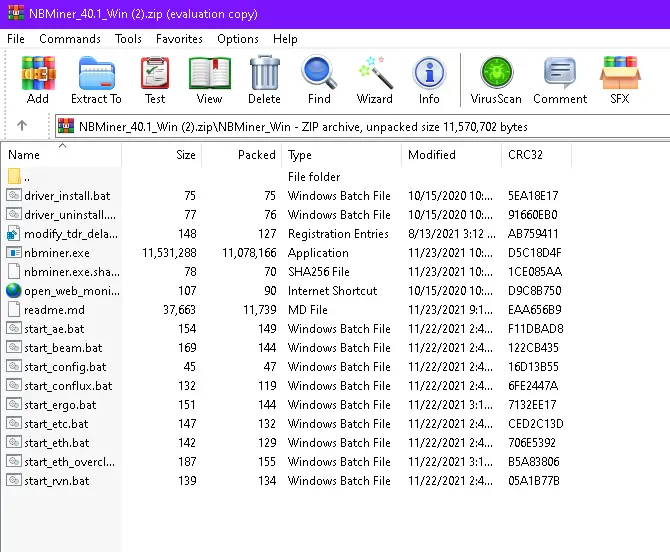
Most miners’ files are set up like the one shown above. Each batch file (ending in .bat) is identified either by the name of the cryptocurrency being mined or by the algorithm, depending on the software. Thus, start_eth.bat is an Ethereum mining script, while start_rvn.bat is for Ravencoin. The first step towards mining is finding the right file to mine your cryptocurrency.
Chances are your miner explicitly lists your coin (by its ticker or abbreviation) or at least its algorithm (i.e. Ethash for Ethereum or ProgPow for Super Zero). Occasionally, though, you’ll have to dig a little deeper, especially if your choice crypto is on the more obscure end of the spectrum.
If, say, you wanted to mine Callisto (which uses the Ethash algorithm), you can simply use the start_eth.bat file. Algorithm is all that matters; these scripts don’t discriminate between coins within an algorithm. You may have to do some research to find out which algorithm the listed coins utilize, but more often than not your crypto will already be listed.
Once you’ve pinpointed the correct batch file, right-click on it and select Edit. This will open the script in Notepad, where you can alter the parameters to suit your specific needs.
Usually the batch file will be filled out with cookie-cutter default parameters and will look something like this:

Everywhere you see a dash followed by one or more characters, a parameter is being set. So, for instance, -a etchash is setting the “algorithm” setting to ETCHash, and -u <address> is setting the “user” parameter to the specified address.
A lot of times the -u parameter will combine the address and worker name like so: <Address>.<WorkerName>. Worker name is simply the name you see when viewing your performance through the mining pool’s UI, so if you have more than one graphics card or CPU it’s sometimes useful to name them (i.e. GPU1, GPU2 or RTX3080Ti, GTX1080) to easily tell them apart. Just make sure the worker name has no spaces.
Server and port are also usually combined into one parameter, typically with a colon. <ServerName>:<Port> is the syntax you’ll come across most often.
Rather than deleting everything, it’s easiest to copy and paste your specific data into the file one piece at a time when setting up a batch file. This minimizes the risk of accidentally editing something you weren’t supposed to, possibly breaking the script.
An Example Batch File Configuration
As an example, let’s look at the following default batch file, borrowed from NBMiner’s start_eth.bat:
@cd /d "%~dp0"
nbminer -a ethash -o stratum+tcp://asia2.ethermine.org:14444 -u 0x4296116d44a4a7259B52B1A756e19083e675062A.default -log
pause
Now, let’s say our desired parameters in this instance are:
Server: us1.ethermine.org

Port: 5555

Wallet Address: 0x9037f7327f66d93170De672B50C9D2a2F98e98c3

Worker Name: RTX3080Ti
Remember, we found these in previous sections (except for worker name, which is arbitrary and could be left out just as easily).
With this information, the end result would look like this:
@cd /d "%~dp0"
nbminer -a ethash -o stratum+tcp://us1.ethermine.org:5555 -u 0x9037f7327f66d93170De672B50C9D2a2F98e98c3.RTX3080Ti -log
pause
Note that we left stratum+tcp://, as this is an essential part of the script.
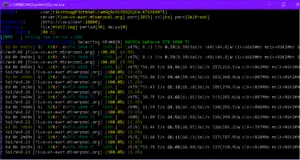
Once your batch file is fully edited, hit Ctrl + S or File > Save to lock in these changes. Once this is done, you can start mining just by double-clicking the .bat file. A screen similar to the one below should pop up, and just like that you’re earning passive crypto.
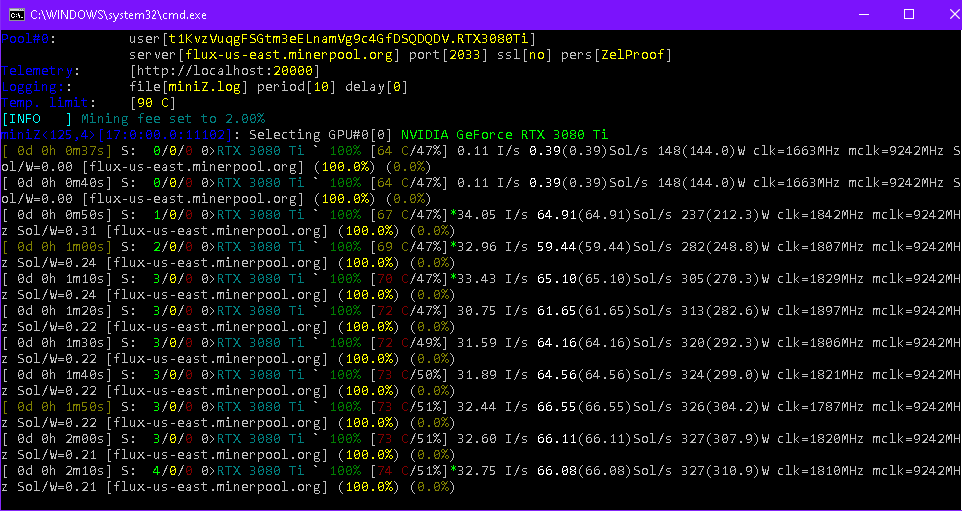
This UI will usually display your hashrates, tell you when your pool has found a block, and most of the time it will display your power consumption and GPU/memory junction temperatures.
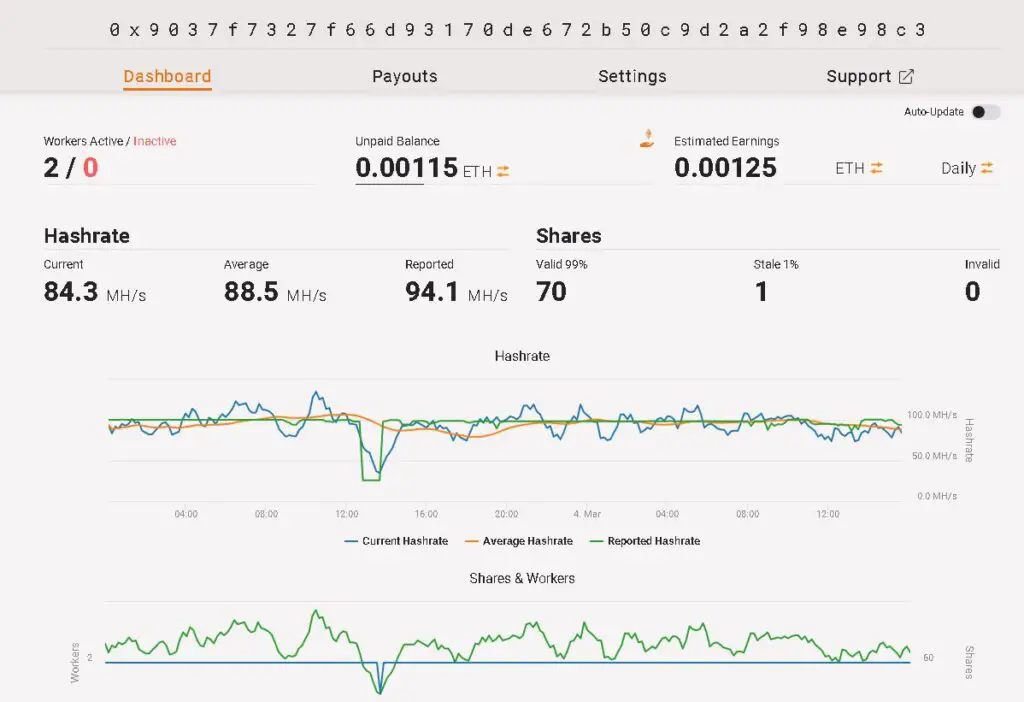
How to View Mining Statistics Online
If you want to check in on how much you’ve mined, view hashrates, or just make sure your machines are still online you can do so through your pool’s website. Just copy and paste the address you’re mining to into the pool’s Miner Address bar and you’ll be taken to your address’ mining statistics page.
Cashing Out
With Ethereum cashing out is very straightforward. As described earlier, you can simply mine directly to Coinbase, Crypto.com, Binance, or another CEX and convert your ETH to fiat with ease. Some cryptocurrencies aren’t supported by these fiat-supporting exchanges, though, and for these more steps are necessary if you want to convert your crypto to cash.
It’s always best to research and plan your withdrawal strategy before you begin mining, since all exchanges have some sort of transaction/withdrawal fees and these can quickly eat through your profits. Before doing this, though, you need to find out which exchanges support your coin of choice.
CoinMarketCap is the best tool for this. On this site you can view a profile of any coin and its price and volume on all supported exchanges (scroll all the way to the bottom to find this screen).
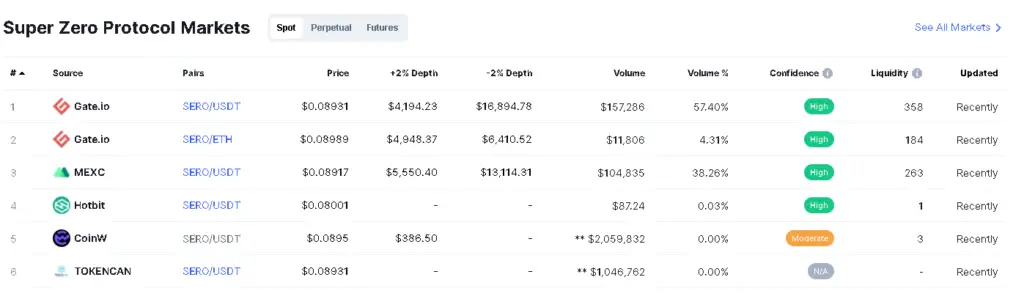
If you were mining Super Zero and looking to cash out, it appears as if Gate.io and MEXC are your two best options. These have good liquidity (so you won’t fall victim to extreme price slippage) and allow you to exchange SERO for Tether, a stablecoin that virtually all CEXs support.
In this scenario, you’d want to create a Gate.io account (or one on MEXC) and send your SERO balance from your SERO wallet to the exchange (using the exchange’s deposit address, much like Coinbase earlier). Once your balance is in the exchange wallet you can convert this to USDT and send this to Crypto.com or Coinbase, where you can then convert it to fiat.
Obviously, that’s a lot of steps just to cash out a bit of cryptocurrency. In this scenario you’re paying exchange and withdrawal fees twice, since you’re going through Gate.io and a crypto-to-fiat CEX.
As such, it’s usually best to stick to the most widely-supported coins since this will minimize your transaction fees while maximizing your profits. Add to this the fact that Ethereum is usually the most profitable coin to mine, fees aside, and you’ll understand why we recommend it for all small-scale miners.
If you’re bent on mining a less-popular altcoin consider holding it in your wallet for the long haul or at least accumulating a sizeable nest egg before converting it to cash. Since most exchange withdrawal fees are flat (not proportional), you’ll eat into a much smaller percentage of your total revenues if you cash out in one large sum rather than multiple smaller ones.
Crypto Mining Guides
We’ve published a good many guides to mining specific cryptocurrencies, and if you’re still lost after reading this generalized guide it may help to read through these more specific ones. These guides cover the exact code and mining software to use when mining specific coins, and will help familiarize you with the process of configuring a miner:
- How to Mine Ethereum
- How to Mine Flux
- How to Mine Toncoin
- How to Mine Super Zero
- How to Mine Raptoreum
- How to Mine Chia
You may also find our article on the best cryptocurrencies to GPU mine useful.
Conclusion
If you made it through this guide, you should know how to mine cryptocurrency with ease. Crypto mining is a nebulous subject, though, and it’s certainly possible that we missed mentioning something important. If that’s the case, just let us know and we’ll be sure to add it in if it would add value to this guide.