Introduction to Motherboards
While the motherboard may not be the most exciting part of your PC build, it’s just as essential as any other component. If you don’t have one (or you buy one that’s incompatible with another part) your rig simply won’t work.
This is because everything is connected to the motherboard in some way, shape, or form. Your CPU, storage drives, memory, graphics card, peripherals, and even case are all either directly seated in the motherboard or connected via cable, either directly or indirectly.
Due to its paramount importance, it’s highly beneficial to understand the basic layout and function of the components in a motherboard. Doing so will make you a more competent PC-builder and improve your ability to troubleshoot if things go awry.
Today’s Deals
- 55% OFF: Nextorage 2TB NVMe SSD 7300MB/s Write 6900 MB/s Read |
$249.99$109.99 - STGAubron ABR0522 Tower with GTX 1660 Super and Core i3-10100F |
$550$495 - HP Victus 15L with RTX 3060 and Core i7-12700F
- Ryzen 9 5900X 12-Core, 24-Thread CPU |
$550$349.99 - ABS Stratos Aqua with Core i5-13400F, RTX 4060 Ti, 16GB DDR5 |
$1499.99$1199.99
Diagram of Motherboard Components and Connectors
Below, we’ve put together a diagram of the most important parts of the motherboard. Motherboard layouts may vary between models (for instance, higher-end boards may have more heatsinks, memory slots, or M.2 slots), however all modern boards tend to have the same general layout, regardless of manufacturer or chipset.
The motherboard shown below is an ASRock B560M-HDV. We chose it due to its lack of heatsinks, which allows for high visibility of all major components.
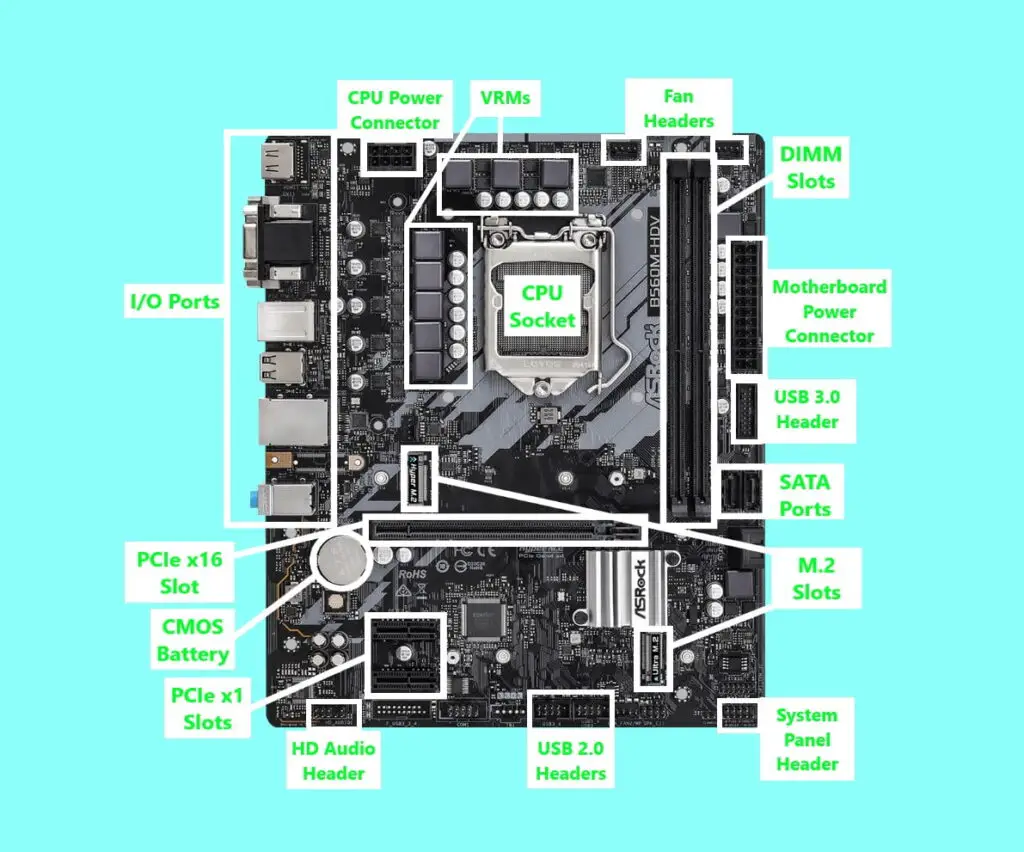
The Parts of the Motherboard
Let’s look at the basic function of each component shown above.
Power Connectors
The power supply is connected to the motherboard in two locations via power connectors.
Motherboard Power Connector
The motherboard power connector, also called the ATX Power Connector, is a 24-pin plugin that supplies the entire motherboard with power. It’s typically found on the far right side of the motherboard. PCIe slots, SATA ports, RAM modules, and more are all supplied power from this plugin.
CPU Power Connector
Typically found near the top of the motherboard towards the left side, the CPU power connector (also called the ATX 12V Power Connector) is where the power supply plugs into the motherboard, supplying electricity to the processor.
CPU Socket
The CPU socket, as its name suggests, is the location in which the processor is housed. All major components are connected to the CPU socket, allowing the processor to control and interact with the memory, graphics card, storage drives, and more.
VRMs
VRMs, or Voltage Regulator Modules, are groups of transistors that deliver power to components and regulate it so that they don’t receive too much. The most important VRM is the one that regulates your CPU’s power, which is typically located to the left and above the CPU socket.
VRMs are composed of two types of transistors, called power chokes and capacitors. Power chokes are the square-shaped transistors, and capacitors are the cylindrical ones next to them.
Higher-end motherboards tend to have VRM heatsinks since these modules tend to get pretty hot, especially when overclocking your CPU. If this is the case, your VRMs may not be visible.
It’s unlikely that you’ll ever need to mess with your VRMs, however it’s good to understand them so you can make an informed decision when buying a motherboard. For a more in-depth look at VRMs, we recommend Logical Increments’ article on the topic.
Fan Headers
Most motherboards have three or more fan headers, the connectors into which any CPU or case fans are plugged. These provide power to the fans.
Motherboards will typically have a specific connector labeled as the “CPU Fan” header, which is almost always the one closest to the CPU socket. It’s important to plug your CPU cooler into this one specifically, since some motherboards will perceive that the CPU cooler isn’t plugged in at all if you don’t.
DIMM Slots
DIMM (Dual In-Line Memory Module) slots, often called RAM or memory slots, are the notches in which your RAM is seated. They’re connected to the CPU, allowing fast data transfer between your memory and processor.
Mainstream motherboards come with either two or four DIMM slots.
SATA Ports
If you’re using a SATA SSD or HDD, you’ll almost certainly attach these to the motherboard via SATA cable. These cables plug into the motherboard’s SATA ports, allowing the storage drive and CPU to interact.
Motherboards typically come with at least four SATA ports, and often have even more. It’s common for some to be facing upwards and some to be perpendicular to the board, as in the graph above (the side-facing SATA ports are directly below the upwards-facing ones).
M.2 Slots
M.2 slots are ports in the motherboard which are primarily used to connect M.2 storage drives or WiFi/Bluetooth expansion cards.
Most modern motherboards come with at least two of these, and they’re often covered with a heatsink. M.2 slots most commonly use the PCIe protocol to transfer data, but some support SATA as well.
See Also: How to Install an M.2 SSD
If a motherboard supports PCIe gen 4, it will usually have at least one M.2 slot that also supports gen 4. This allows for extremely fast data transfer speeds with a gen 4 SSD.
PCIe Slots
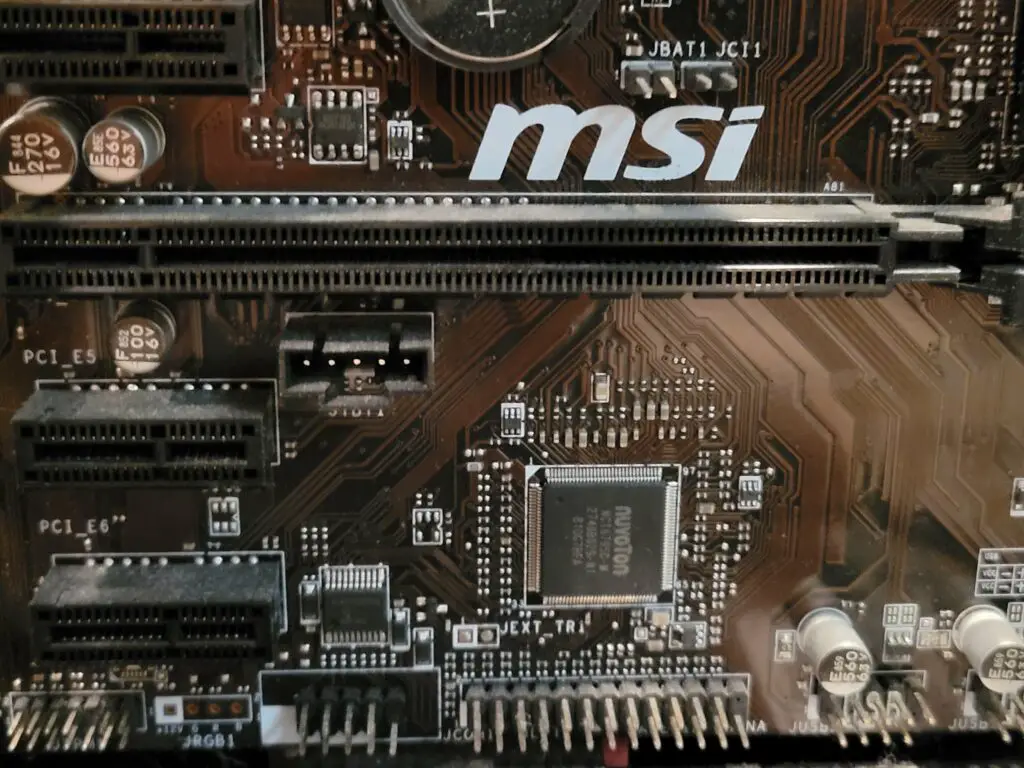
PCIe slots are used to connect expansion cards to the motherboard. They can come in a variety of sizes; the bigger they are, the more “lanes” they support.
CPUs support only a limited number of PCIe lanes, and the quantity varies between models. A PCIe x16 slot, for example, uses 16 of these lanes, while a PCIe x4 slot uses only four.
Different components use different numbers of lanes. For instance, discrete graphics cards use 16, while PCIe SSDs use four apiece.
Motherboards use different combinations of PCIe slots. For instance, the B560M-HDV shown in the diagram uses only one PCIe x16 and two PCIe x1 slots, in addition to the M.2 slots. Other boards like the Z590 Aorus Xtreme use three PCIe x16 slots.
It’s important to note that smaller cards, such as a PCIe x4 card, can be plugged into larger slots, such as a PCIe x16. PCIe slots typically come in four sizes: x1, x4, x8, and x16.
USB Headers
If you want to plug USB devices directly into your chassis, you’ll need to connect the cables provided with the case into the motherboard’s USB headers.
USB headers nowadays typically come in two varieties: USB 2.0 and USB 3.0. As you could probably guess, USB 3.0 supports a significantly higher data transfer bandwidth: USB 2.0 supports up to 480 Mb/s, while 3.0 can transfer 4800 Mb/s.
HD Audio Header
The HD Audio header is similar to the USB headers, in that it allows you to use peripherals that are plugged directly into your case. In this instance, those peripherals are audio devices like headsets, microphones, or audio interfaces.
System Panel Header
If you want to power on your PC with the power button (which we highly recommend), you’ll need to make use of the system panel header. This is where the rest of your chassis cables are connected, including the ones that control the power switch, power button LEDs, and reset button.
I/O Ports
Lastly, your motherboard has a great number of ports built into the side, which allow you to connect peripherals directly into the motherboard. These are known as I/O (input/output) ports, and they typically include several USB ports, an Ethernet plugin, some audio jacks, and a couple of display ports (usually VGA, HDMI, DVI, or DisplayPort).
In most case designs these ports will faces outwards at the back of the chassis.
Art of PC is reader-supported. We may earn a commission if you make a purchase using one of our affiliate links. Thanks for your support!