This article is part of our PC-building beginner’s guide. You can view the entire guide here.
How to Assemble Your PC:
This is the part you’ve been waiting for: assembling the parts and completing the masterpiece that is your PC. Keep in mind that it’s impossible to write a perfect step-by-step guide to assembling a PC since there are too many variables at play, especially in case design.
As such, some steps may vary slightly when building your own PC, but the bulk of the process should follow these steps. I would recommend looking up videos of someone assembling a PC with your specific case if you’re ever unsure of how a certain area is accessed.
Today’s Deals
- 55% OFF: Nextorage 2TB NVMe SSD 7300MB/s Write 6900 MB/s Read |
$249.99$109.99 - STGAubron ABR0522 Tower with GTX 1660 Super and Core i3-10100F |
$550$495 - HP Victus 15L with RTX 3060 and Core i7-12700F
- Ryzen 9 5900X 12-Core, 24-Thread CPU |
$550$349.99 - ABS Stratos Aqua with Core i5-13400F, RTX 4060 Ti, 16GB DDR5 |
$1499.99$1199.99
Before you start, we’d like to throw in one last note: your parts aren’t nearly as fragile as you think. If it’s your first time building, you may feel like you’re going to break the motherboard when putting the RAM in (and you might feel like you’re breaking the RAM sticks too) but PC parts are far sturdier than you think.
Don’t be careless or use more force than necessary, but know that your parts can handle a lot more than you think.
Now, let’s take a look at how to actually put together the parts that you’ve so carefully selected.
Open the Case Up
Take the side panel off of the case to access the interior. Designs vary but typically if your side panel is made of tempered glass or acrylic, it will be held in place by four screws located in each corner of the glass.
Another common design is having two screws or clips on the front or back and having the front/back panel slide off. If your side panel is made of metal, this is probably the design.
If you can’t figure it out, it never hurts to consult your case’s instruction manual.
Install Your CPU
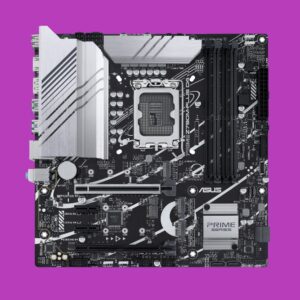
Take your motherboard out of the box, remove it from its antistatic casing, and place it on top of the box it came in, preferably with the included foam sheet beneath it for padding.
It’s best to install your CPU, cooler, RAM, and any M.2 SSDs you may have before installing the motherboard in the case, as this makes for the easiest access.
If there’s a plastic cap on the motherboard’s CPU socket, remove it at this time.
Design varies between AMD and Intel boards/CPUs, but installing the CPU is relatively simple regardless of brand. Unlock the lever arm on the CPU tray (if needed) and drop the CPU in the socket, making sure the arrow printed on the corner of the CPU is lined up with the arrow in the corner of the socket (if there is one). Otherwise, line it up with the bottom left corner of the socket, as shown below. As you can see, the notches in the side of the CPU are also lined up with the corresponding protrusions in the socket, so you can tell it’s aligned correctly by this as well.
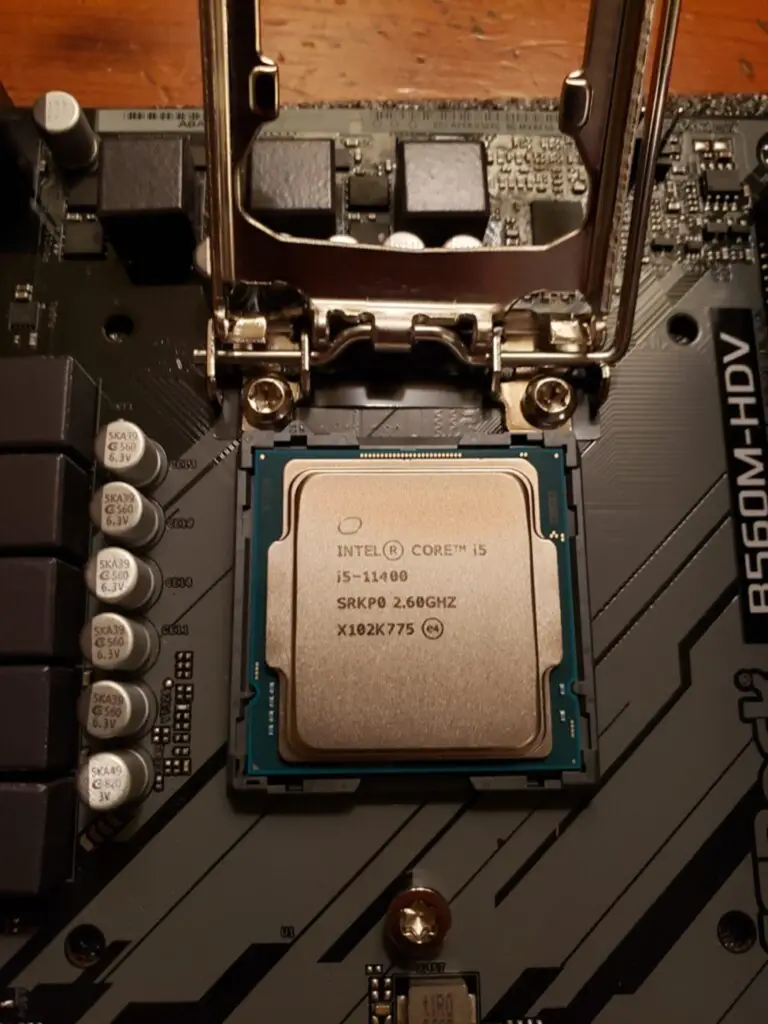
Make sure the processor drops snugly into place without being forced. Once it’s in position, close the lever arm down. It will provide a good bit of resistance, but as long as the CPU is properly in place you need not worry about crushing the CPU or socket pins.
Install Your CPU Cooler
Cooler installation varies by mount type and model. For best results consult the instruction manual or, more realistically, look up a YouTube video on how to install it.
Whatever cooler you’re using, make sure not to forget the thermal paste. Many new builders don’t realize how important it is; if you don’t have thermal paste your PC won’t run, at least not for long.
When applying thermal paste, your primary goal should be to cover the entire CPU lid (the metal part) with the thinnest possible layer of paste.
For most CPU sizes, applying a dot roughly the size of a pea in the center of the CPU, and then installing the cooler on top of this, will be just the right amount.
You can always press the cooler down, lift it to check the paste’s coverage, and then add a tiny bit more if needed. It’s also important to note that some coolers come with pre-applied thermal paste. If your cooler has a sticky gray paste on it, there’s no need to apply additional paste to your CPU.
Finally, take the 4-pin cable that’s attached to your CPU cooler’s fan(s), and plug them into the nearby fan slot, typically labeled “CPU FAN.”
Install Your RAM
Next, you’ll want to install your computer’s memory. The first step is to figure out which slots you’ll be using.
If your motherboard has four DIMM slots and you only have two RAM sticks, you’ll want to install the modules in the 2nd and 4th slots.
If you have the same number of RAM modules as slots (e.g., you have two DIMMs and two slots or four DIMMs and four slots), just install one in each. The order doesn’t matter.
To install a memory stick, press back the clips on the ends of the RAM slots so that they’re in the open positions.
find the notch in the DIMM, near the center of the RAM stick in the middle of the gold-colored pins. Orient the RAM stick such that it spans the length of the RAM slot, and the notch in the DIMM lines up with the corresponding notch in the motherboard.
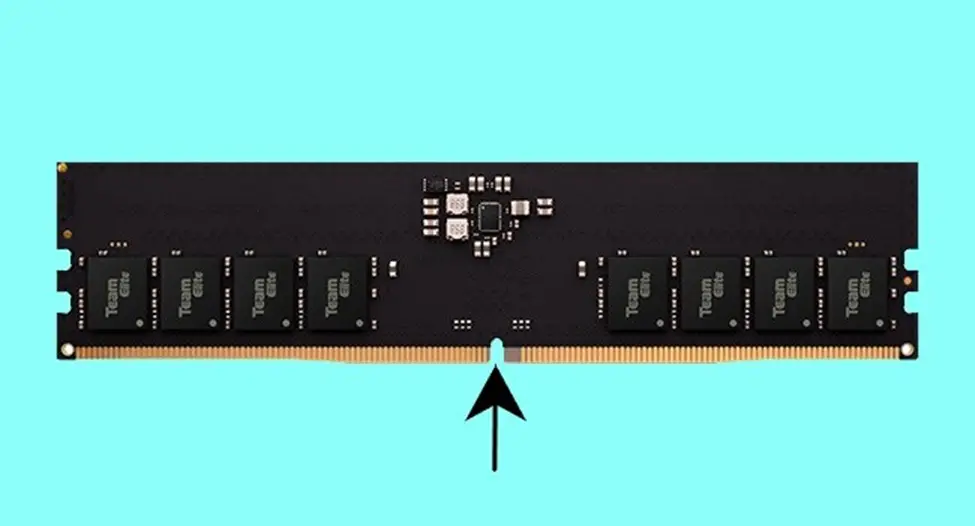
If it doesn’t seem to fit, you may have the DIMM oriented in the wrong direction. Simply turn it the other way.
Once you’re certain the DIMM is sitting correctly, press one end downwards with firm, consistent pressure. If your motherboard only has a clip on one end of the RAM slot, you should apply pressure to the side opposite of the clip, so that your RAM stick is raised on the clip’s side, as in the example below.
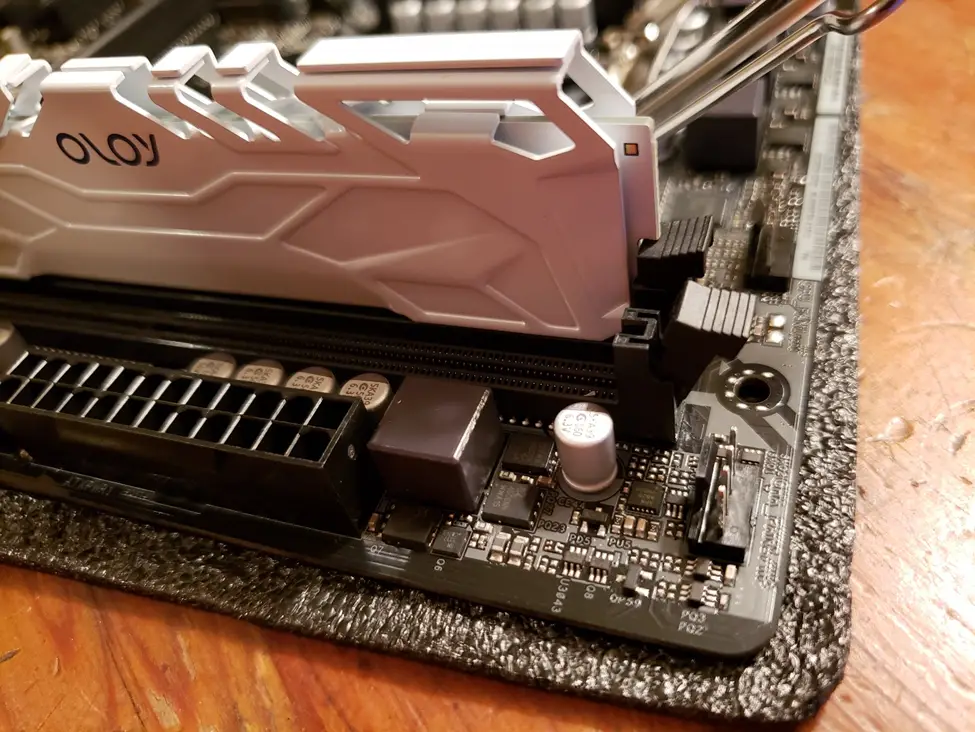
If your motherboard’s DIMM slots have two clips, it doesn’t matter which side you press down first. You’ll know you’ve seated one end of the module correctly when the clip on that side pops into the closed position on its own.
Once the DIMM is seated on one end, apply pressure to the other end. This should cause the clip on that side to pop into place as well. When the module is seated flush against the slot and all clips are in the closed position, this is a good sign that you’ve installed the module correctly.
Repeat this process for all memory modules, and you’re done with this step!
Install Your M.2 SSDs
If you have an M.2 SSD or two (which we highly recommend, by the way), you’ll want to add these into the motherboard before you install the motherboard into the chassis. See our guide to installing an M.2 SSD for more information, or just read on.
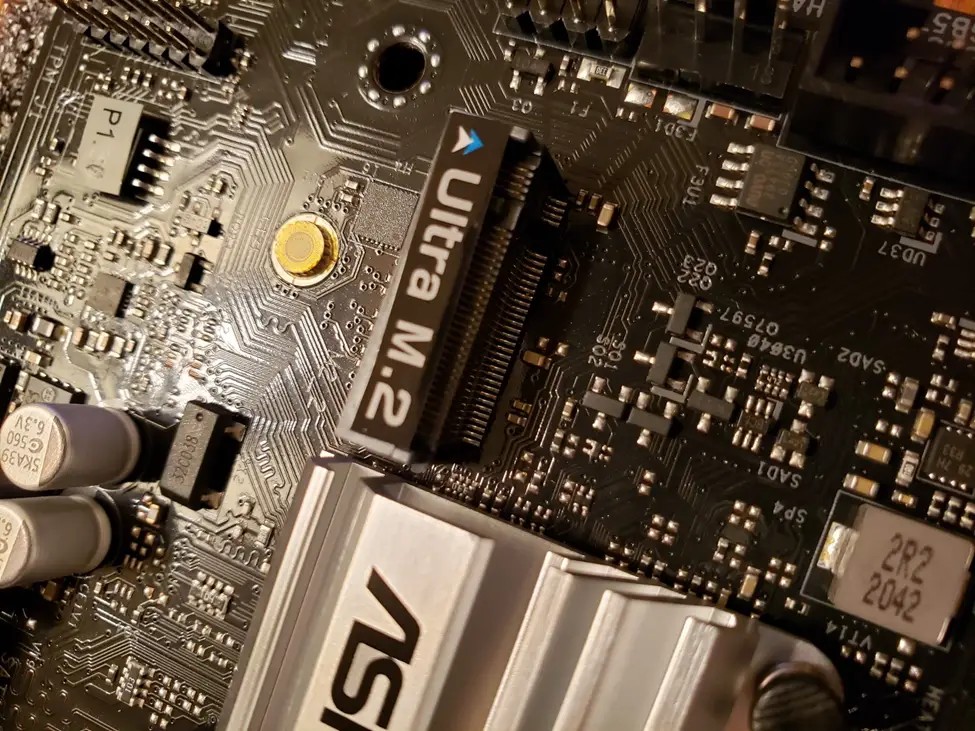
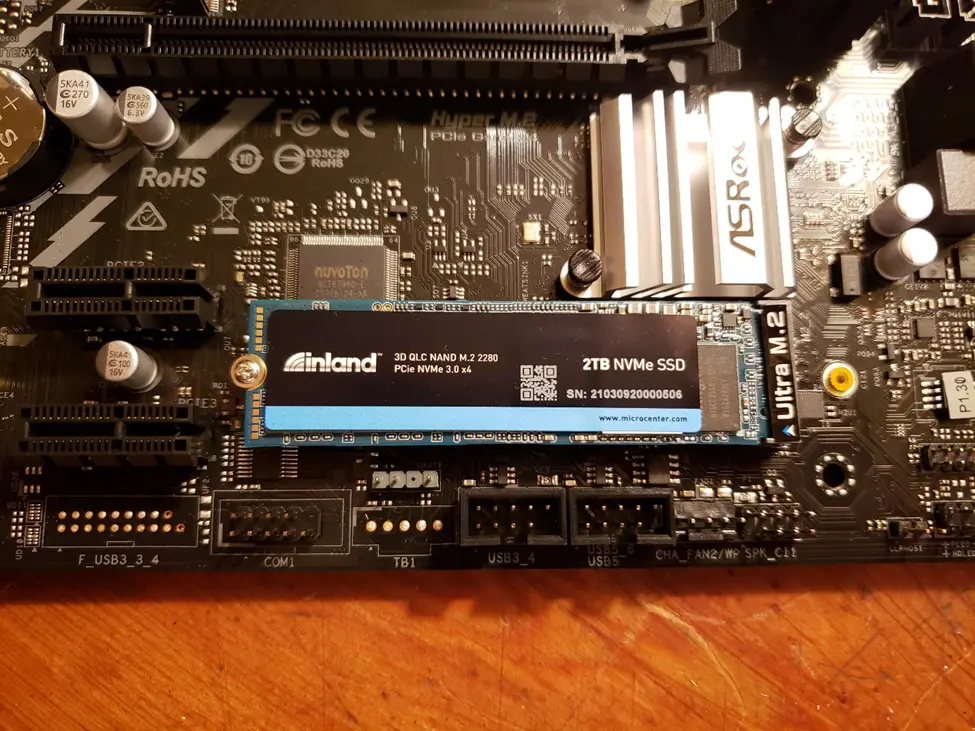
First, find your M.2 slots on your motherboard. They should look similar to the image above, and will frequently be labeled “M.2”. Sometimes they’ll be covered by a metal heatsink. If so, remove the screws holding the heatsink in place and set it aside.
When reinstalling the heatsink (if applicable), peel off the sticker on its backside so that, when reinstalled, it adheres to the SSD and cools it well.
If you have multiple SSDs, you’ll want to install the fastest drive in the slot closest to the CPU. If you only have one, install it into this same topmost slot.
To do this, line up the notch on the M.2 drive with the notch in the M.2 slot, much like you did with your memory.
Holding the SSD at roughly a 30-degree angle from the motherboard, push the M.2 SSD gently into the slot. It should slide in with little difficulty.
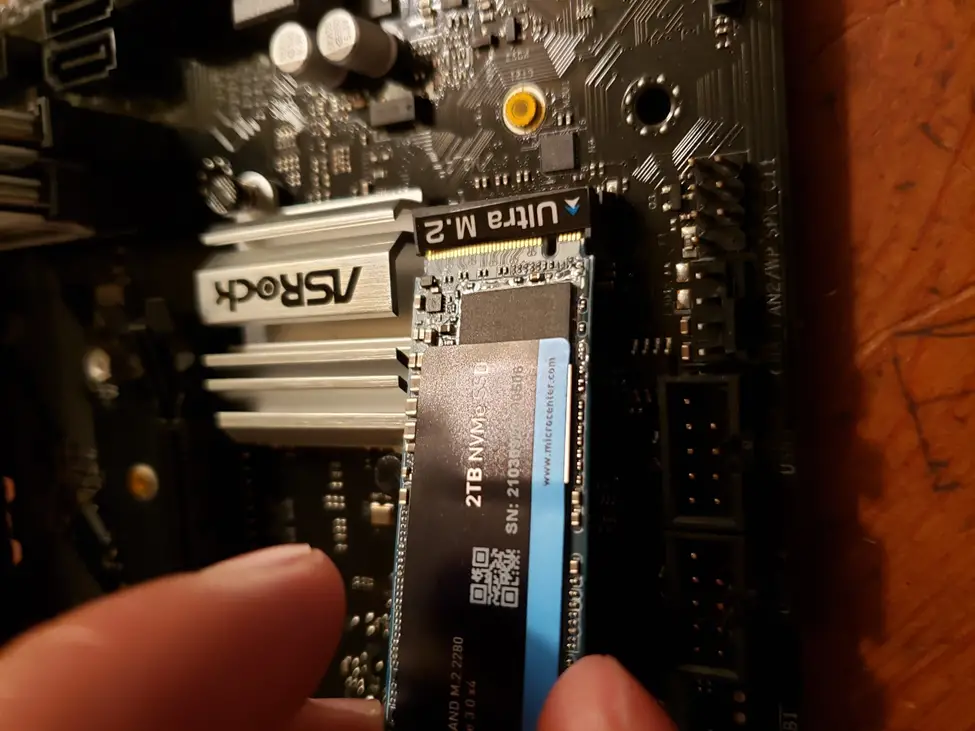
When it’s all the way in, it will look something like this:
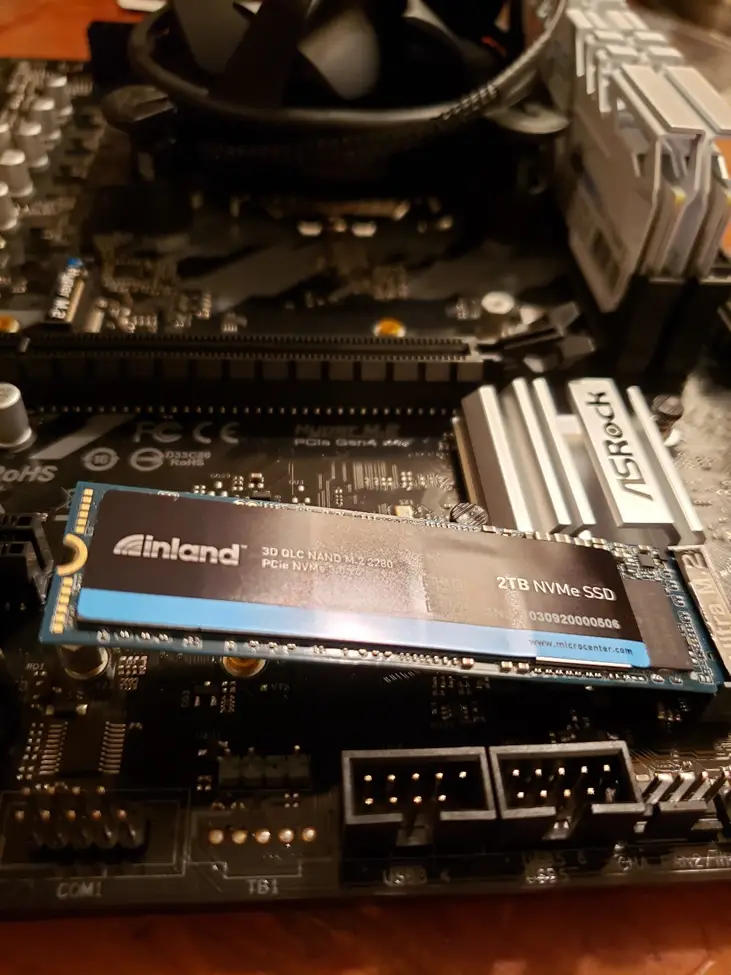
The motherboard (or PCIe add-in card if you’re using one) should come with an individually packaged single screw. Push the M.2 drive downwards so that it lies parallel to the motherboard. Use the screw to secure the drive to the motherboard, and you’re done installing your new SSD!
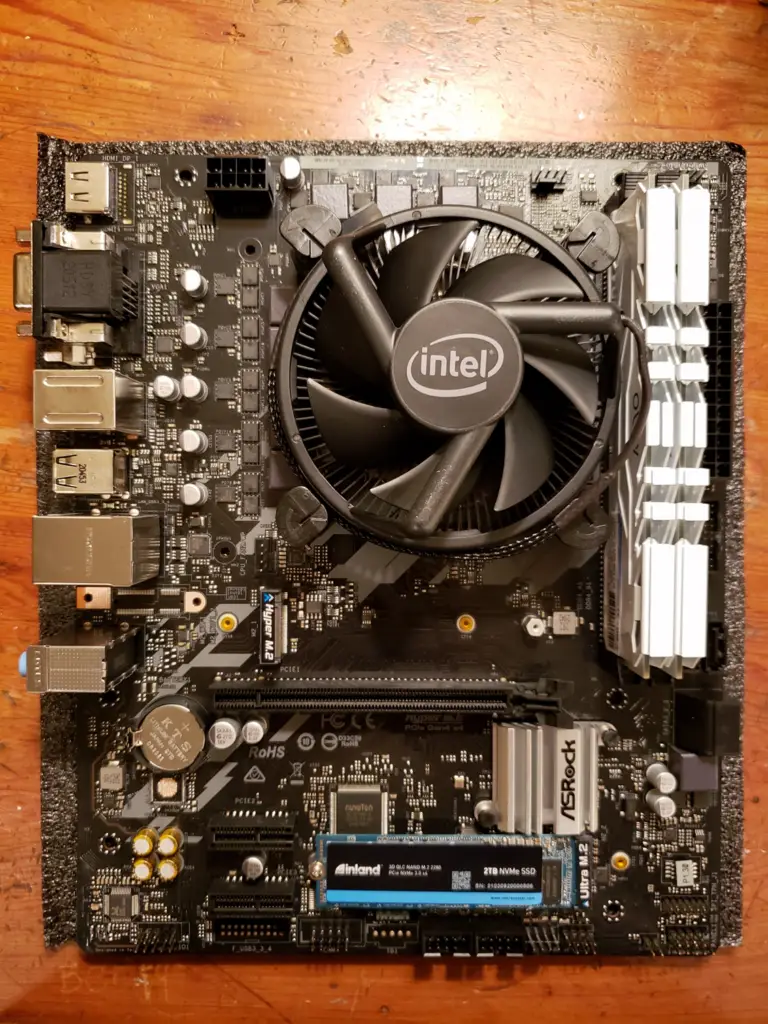
When you’re finished installing your CPU, cooler, RAM, and M.2 SSDs, your motherboard should look similar to the image below:
If you’ve made it this far, congratulations! You’re well on your way to having a fully functional PC.
Install Standoff Screws
For your motherboard to function properly, there needs to be some space between it and the metal of your case interior. This is where standoff screws come in; they elevate the motherboard just a little bit.
First, find the standoff screws. Usually these are found in a plastic bag inside of the case. There are many small holes in the case interior, usually labeled with a letter next to them (usually “A” for ATX, “M” for micro-ATX, or “I” for mini-ITX).
Screw the standoffs into the hole that match your motherboard form-factor.
Install I/O Plate
Find the I/O plate, the shiny piece of metal that comes in the package with the motherboard.
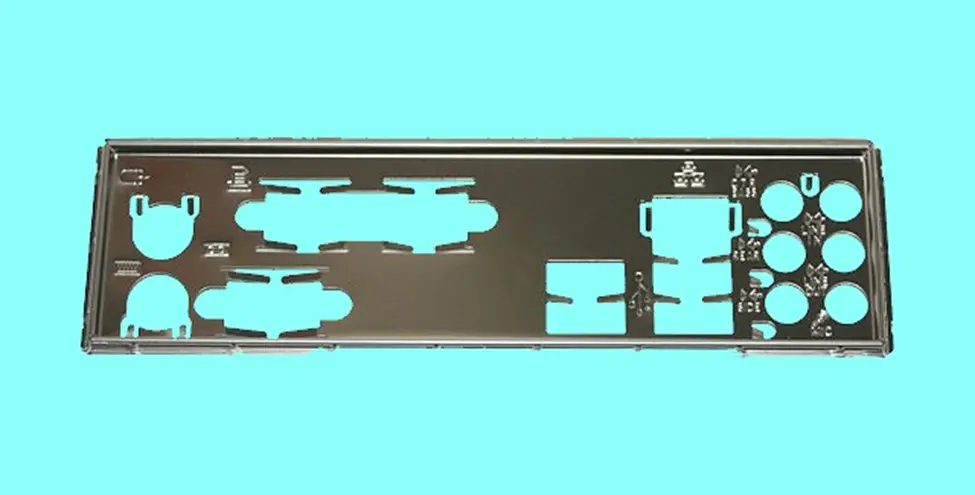
Place it so that the text is readable and right-side-up when looking from outside the case. Snap all four corners into place, making sure it is firmly secured.
Connect the Front Panel Header
It won’t always be possible at this point in the process, as the cables may be too short, but often you can install front panel connectors before installing the motherboard.
It’s much easier to do this way, since it can be pretty dark in your PC case, and you’ll have to reach in at sometimes awkward angles.
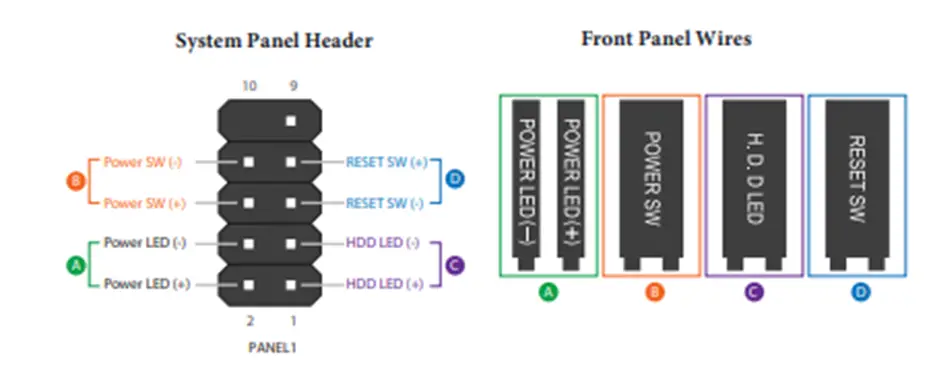
The front panel cables connect your motherboard to your case, and are what allow the USB, audio, and other ports on the front panel, top, or side of your PC to function.
For this step, it’s essential that you consult your motherboard’s manual. This will tell you which pins each wire plugs into the system panel header. This array of pins is usually found in the bottom right corner of your motherboard.
You may want to use tweezers, and it often helps to use a headlamp or bright overhead lights as well.
Each connector is labeled with a positive (+) and negative (-). Take great care to orient the cables in the correct direction. Otherwise, even if you install it in the correct location, it may not work, or work incorrectly.
Install Your Motherboard
Holding your motherboard by the CPU cooler, slide it into place so that all of the ports on the left side of the motherboard stick through the I/O shield correctly, and all of the holes in the motherboard are correctly aligned with the standoffs.
It may take a bit of force to position the motherboard perfectly, since the I/O plate has spring-like metal strips facing inwards.
Once the motherboard is in place, secure it using the screws that came with the case. These are typically found in the same bag as the standoffs.
Tighten them a little at a time, making sure that the screws are snug but not overtightened, as this could crack your motherboard.
You can tell the screws are tight enough when you are able to press gently on the motherboard without it rocking or wiggling.
Install Your Graphics Card
If you don’t have a dedicated graphics card, feel free to skip this section.
Remove the protective tab from the video card’s rear if needed. Case designs vary from model to model, but in most instances there is a panel in the case’s rear panel, directly to the left of the PCIe slots. Unscrew this panel, then unscrew the metal strip that’s on the same vertical plane as the PCIe slot in which you intend to install your graphics card.
The PCIe slot will have a tab on one or both sides, much like a RAM slot. Push down these tabs and line up the slit in th8e graphics card with the notch in the PCIe slot.
Press the graphics card into the slot, first on the left side until you feel it snap into place, then on the right. If the tabs that you pressed down in the beginning pop back into place, this indicates that the graphics card is seated correctly.
Using screws that came with the case, secure the metal portion of the graphics card outside of the case. If there was a metal plate that covered this, reinstall this as well.
Install Your Power Supply
Before placing your power supply in your case, plug all necessary cables in. This may include 6 or 8-pin PCIe cables for your graphics card, a 4 or 8-pin connector to power your CPU, a 24-pin ATX cable to power your motherboard, and SATA cables to supply your hard drives and SATA SSDs with power.
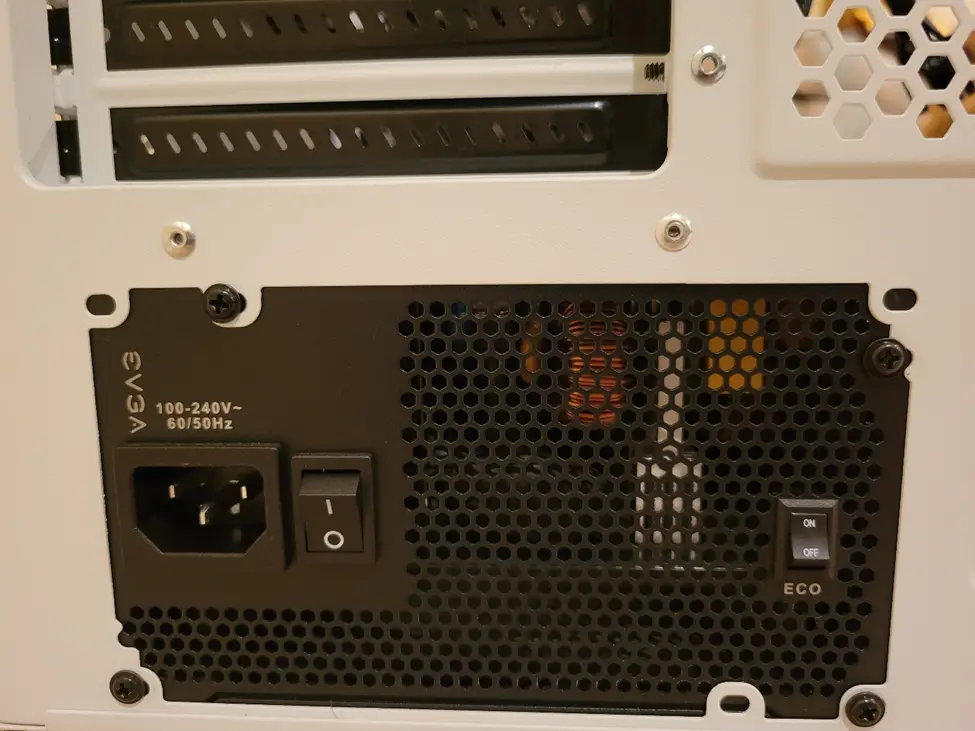
Once all desired cables are plugged into your PSU, place the unit inside the chassis up against the rear panel, such that the side that plugs into the wall is facing outwards, as shown below.
Depending on the case design, you may need to remove the opposite side panel to access the space where the power supply goes, especially in cases with a PSU shroud.
Next, find the power supply screws that came with your case. These usually have relatively flat, large heads. Screw these into the holes that are already drilled into your power supply, using your non-dominant hand to hold the PSU firmly against the rear of the case as you screw them in.
When all screws are secure and the PSU is secure against the case, you’ll know that you’ve installed it correctly.
Install Any SATA Drives
If you’re using any SATA SSDs or HDDs, find the SATA cables that came with your motherboard. They look like this:
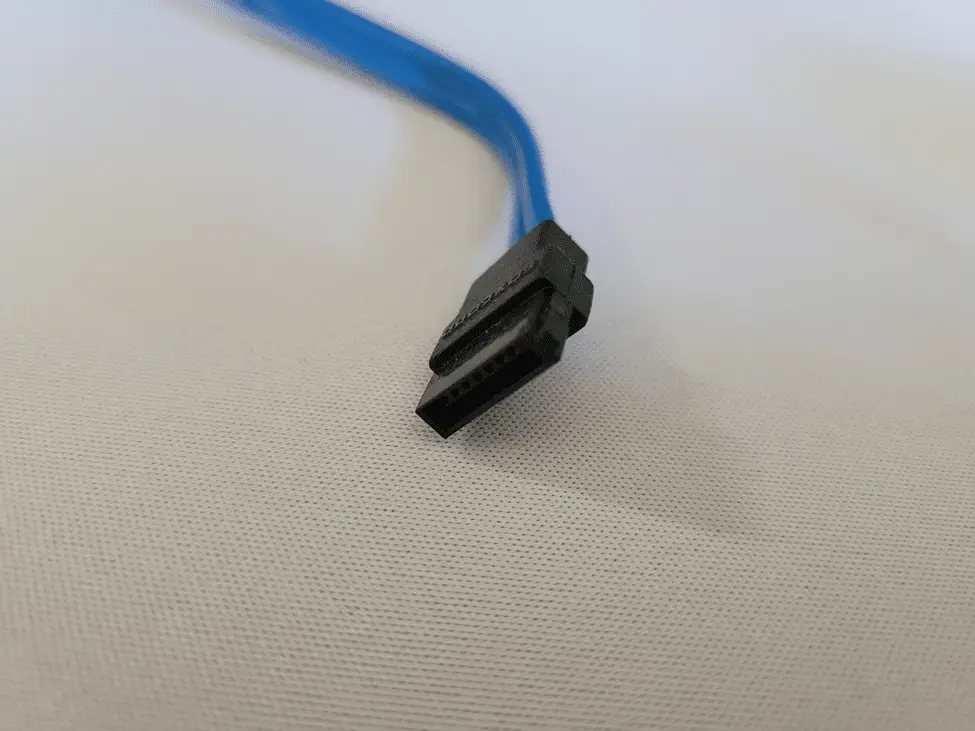
Install your HDDs or SSDs into the chassis. Many case designs feature drawer-like designs where you can insert hard drives, while others have holes drilled out where you can secure your drive with screws.
Consult your case’s user manual if you’re unsure how exactly to install a storage drive.
Once your drives are installed, plug one end of the SATA cable into your drive, and the other end into a SATA port on the motherboard. In some instances, it’s best to plug the SATA cable in before installation of the drive, while other times this isn’t feasible. User your best judgment based on the case’s design.
Route Your PSU Cables
This is a fairly easy step to complete, but a difficult one to master. Routing cables isn’t too tricky but routing them cleanly so that their presence in your case isn’t overpowering is another thing entirely.
Like many steps in this process, the exact way you go about doing this will come down to your case’s design, as well as the length of your power supply cables to a lesser extent.
In most modern cases, your power supply will be hidden behind a PSU shroud, so you’ll need to run your cables through holes in this into the other side of the case, where your motherboard and other components are housed.
The order doesn’t matter greatly, but you need to plug all of these cables in:
- The 24-pin ATX cable that powers your motherboard
- The 4 or 8-pin cable that powers your CPU
- The 6 or 8-pin PCIe cable(s) that powers your GPU
- SATA power cables for each SATA storage drive
Regardless of your choice of components, you’ll always need the motherboard and CPU cables plugged in. If your graphics card uses 75W or less of power (or if you have an integrated GPU), it will receive power directly from the motherboard and thus won’t have a plugin.
Likewise, if you don’t have any SATA drives, you need not worry about using these cables.
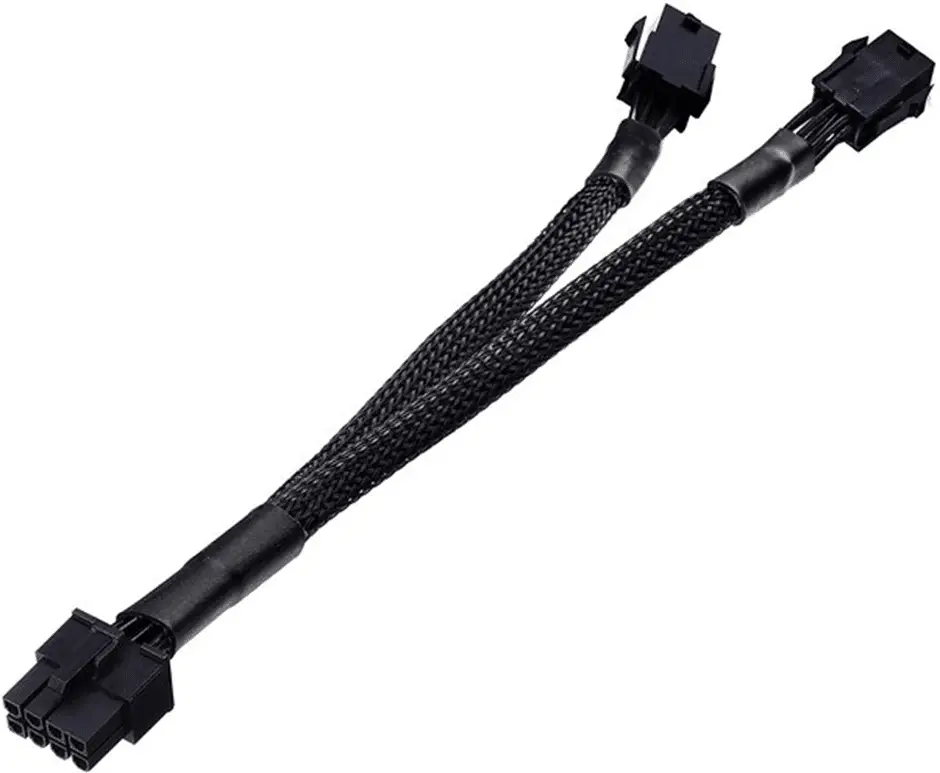
If your graphics card has two power plugins (for example, some video cards require two 8-pin PCIe power plugs), take great care to never plug a single daisy-chained cable (like the one shown below) into both ports. Instead, use two separate PCIe power cables running from the power supply, as this will provide more wattage to your graphics card and will help you to avoid any issues in the long run.
Connect the Front Panel Header
If you haven’t already, connect the front panel header now. This process is detailed in the section “Connect the Front Panel Header.”
Wrapping Up
At this point, you’re nearly done! Reinstall the side panel and plug in the cable that runs from the wall to your power supply. Plug in your ethernet cable, HDMI or DisplayPort cables, and any peripherals that you want connected.
If you have a dedicated graphics card, make sure that you plug any display cables into your graphics card, not into the motherboard. Otherwise, you’ll end up with a black screen.
Also, note that you’ll need a DisplayPort cable (or in some cases an HDMI 1.4 or higher) to run a monitor at a refresh rate above 60hz.
Lastly, flip the switch on your power supply into the “on” position if it isn’t already. You’re finished with the build process and ready to boot.
Setting Up Your PC
When you boot up your PC for the first time, you will need to have a boot device. The best way to do this is to buy a USB flash drive and download the Windows boot media using another computer. You can find the Windows boot media creation tool here.
After creating the boot media, insert it into a USB port on your newly-built PC and press a key. This will open the Windows 10 setup wizard, and it will guide you the rest of the way through the setup. It will prompt you to enter an activation key, but you don’t have to have one. If you do decide to buy it, you can download it here.
If you don’t buy Windows 10, the vast majority of your experience will be exactly the same as that of a paid user. The only difference is that you’ll have limited access to security patches, updates, and a few other features, but these may not be worth the hefty price tag.
As a final note, if your PC was built for gaming, you may want to optimize Windows 10 for maximum gaming performance. See our guide on optimizing Windows 10 for gaming for more information.
How to troubleshoot if your PC doesn’t boot
Ideally, when you press the power button for the first time your LED’s light up, your case fans will start spinning and your computer will boot up perfectly. Unfortunately, it doesn’t always go that way. The good news is that the issue is frequently fixed with ease, and can be solved with some simple troubleshooting. Here are some common things to try if your PC doesn’t boot up on the first try.
Check Your Front Panel Header
Make sure your front panel cables are plugged in correctly. Consult your motherboard manual and make sure that you’ve lined them up correctly.
Since one of these cables controls your power button, if it’s not in the right place your power button may not work, making it impossible to boot.
Check Your CPU Cooler
Make sure that your CPU cooler is plugged into the connector labeled “CPU FAN.” If you plug it into another connector, your computer may erroneously think that a CPU cooler is not connected and shut down to avoid overheating.
Check Your RAM
Disconnect all but one stick of RAM, and make sure that it is seated perfectly. If the computer boots when this is done, you either have a bad stick of RAM or one of the sticks wasn’t seated correctly the first time you installed it.
Check Your Storage Drives
Disconnect the power from your storage drive. If your computer boots when this is done, it usually means that either the power cable or storage drive was faulty. Try with a different power cable if your power supply came with more than one.
Try Booting with Integrated Graphics
If you have integrated graphics, take out the graphics card and try booting. If it boots without the graphics card, reinstall it and try again.
Your graphics card may have been incorrectly seated the first time. If this doesn’t work, you might have a faulty graphics card or power cable running to your card.
Flash Your BIOS
Flash your BIOS. Your motherboard’s BIOS may need to be updated to be compatible with newer processor models. Learn how to flash your BIOS here.
Note that this probably isn’t the problem if your CPU is from the same generation as your motherboard. It’s most common when your CPU is from a newer generation than your motherboard but has the same socket type.
Check for Motherboard Shorts
If all else fails, unscrew your motherboard and place it on top of a cardboard box. Try booting your system up outside of the case. If this works, check for anything, especially metal, that could have been touching the bottom of the motherboard. It’s possible that you installed an extra standoff that didn’t belong and was touching the bottom of the motherboard causing a short.
Last Resorts
If none of these options work and your PC still won’t boot, it’s worth ordering a new power supply and trying with that one. If this doesn’t work, it’s likely that your motherboard has been damaged.
You can take your build into a shop if you’re willing to spend the money or order a new motherboard and start from scratch.
If you’re reading this before you build a PC and thinking of all the horrible things that could go wrong, just remember that the majority of the time first-time PC builders are successful.
Follow the instructions carefully and be gentle with your components, and you probably won’t have to make use of this troubleshooting section.