Overview:
For the month of April, we’ve put together a build featuring one of Intel’s brand-new Rocket Lake CPUs, the 11600K. It’s pretty RGB-heavy but very functional, and pairs the 11600K with the GTX 1660 Ti, a cost-efficient card that puts up some impressive numbers.
| Graphics Card: | GTX 1660 Ti | Check Price: Amazon | Newegg |
| Processor: | Intel i5-11600K | Check Price: Amazon | Newegg |
| CPU Cooler: | ABKONCORE CT405W | Check Price: Amazon |
| Motherboard: | ASRock Z590M Phantom Gaming 4 | Check Price: Amazon | Newegg |
| RAM: | XPG Spectrix D60G 3200MHz (2x8GB) | Check Price: Amazon | Newegg |
| Storage: | PNY CS3030 1TB NVMe SSD (3500MB/s) | Check Price: Amazon | Newegg |
| Case: | Corsair iCue 220T (White) | Check Price: Amazon | Newegg |
| Power Supply: | EVGA 550W B5 Bronze Fully Modular | Check Price: Amazon | Newegg |
| Monitor: | Dell S2421HGF 24″ 1ms 1080p 144hz | Check Price: Amazon | Newegg |
| Cables: | For 144hz: DisplayPort Cable or HDMI 1.4 Cable | Check Price: Amazon | Newegg Check Price: Amazon | Newegg |
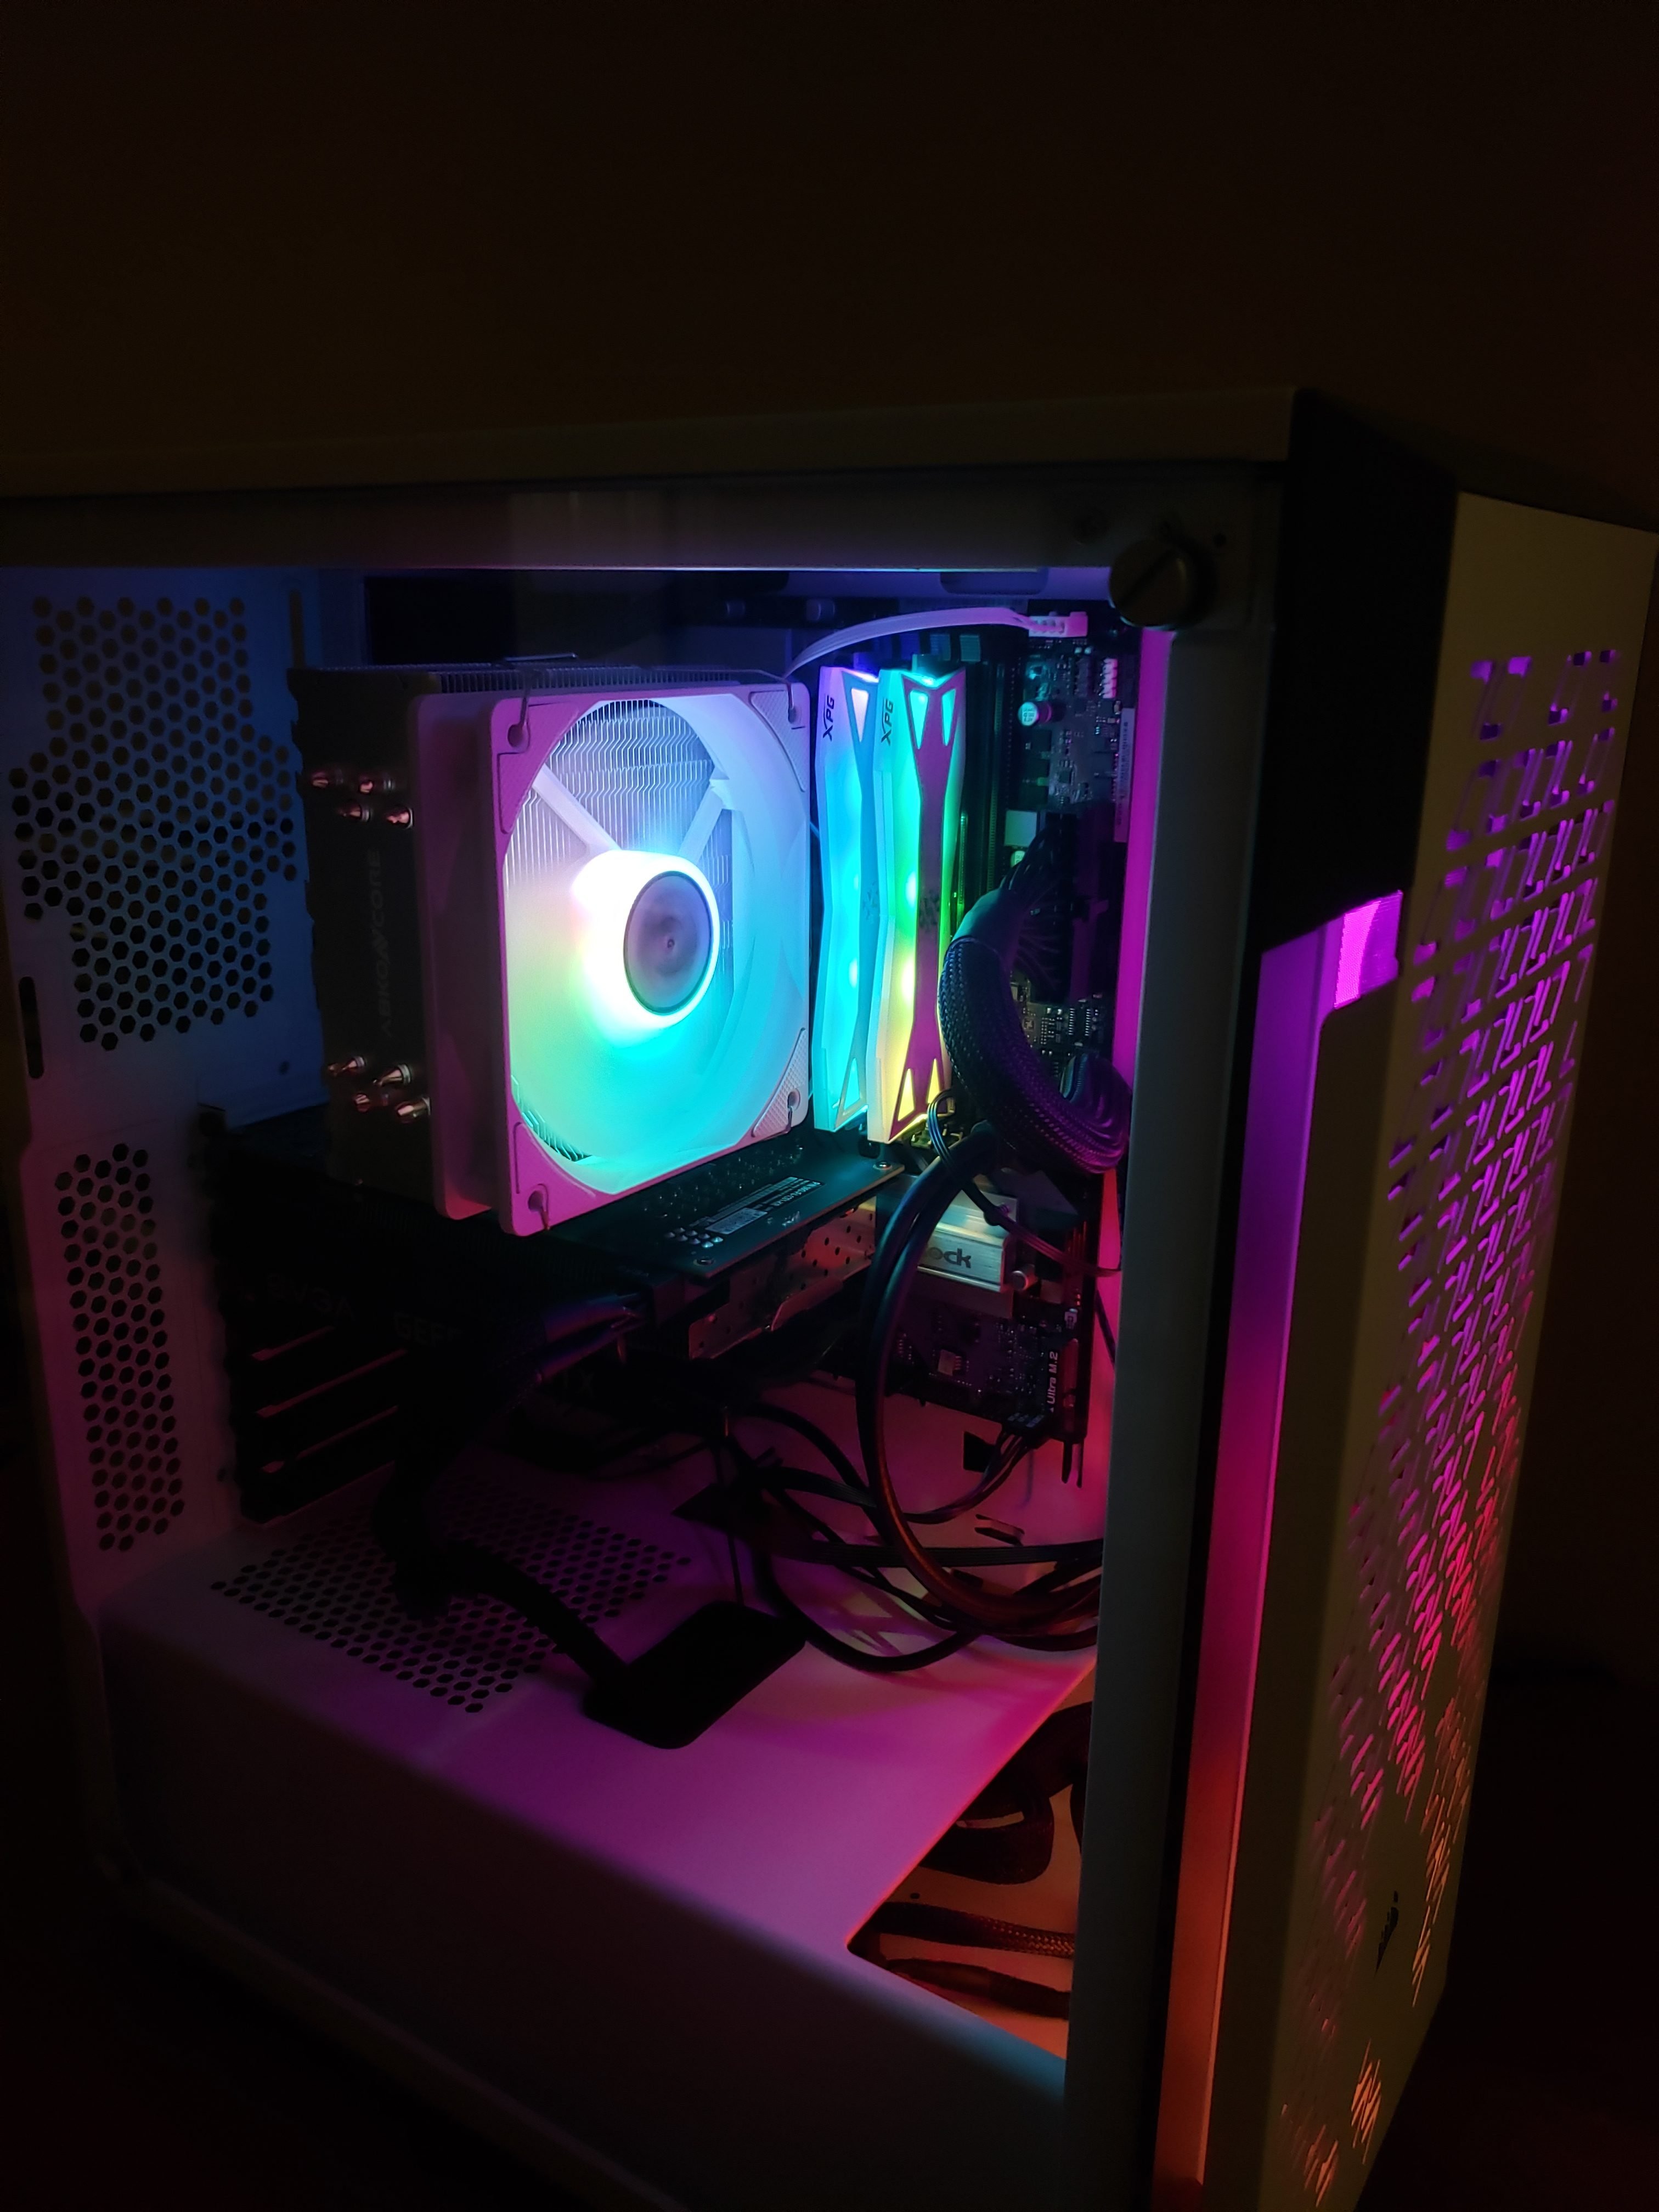
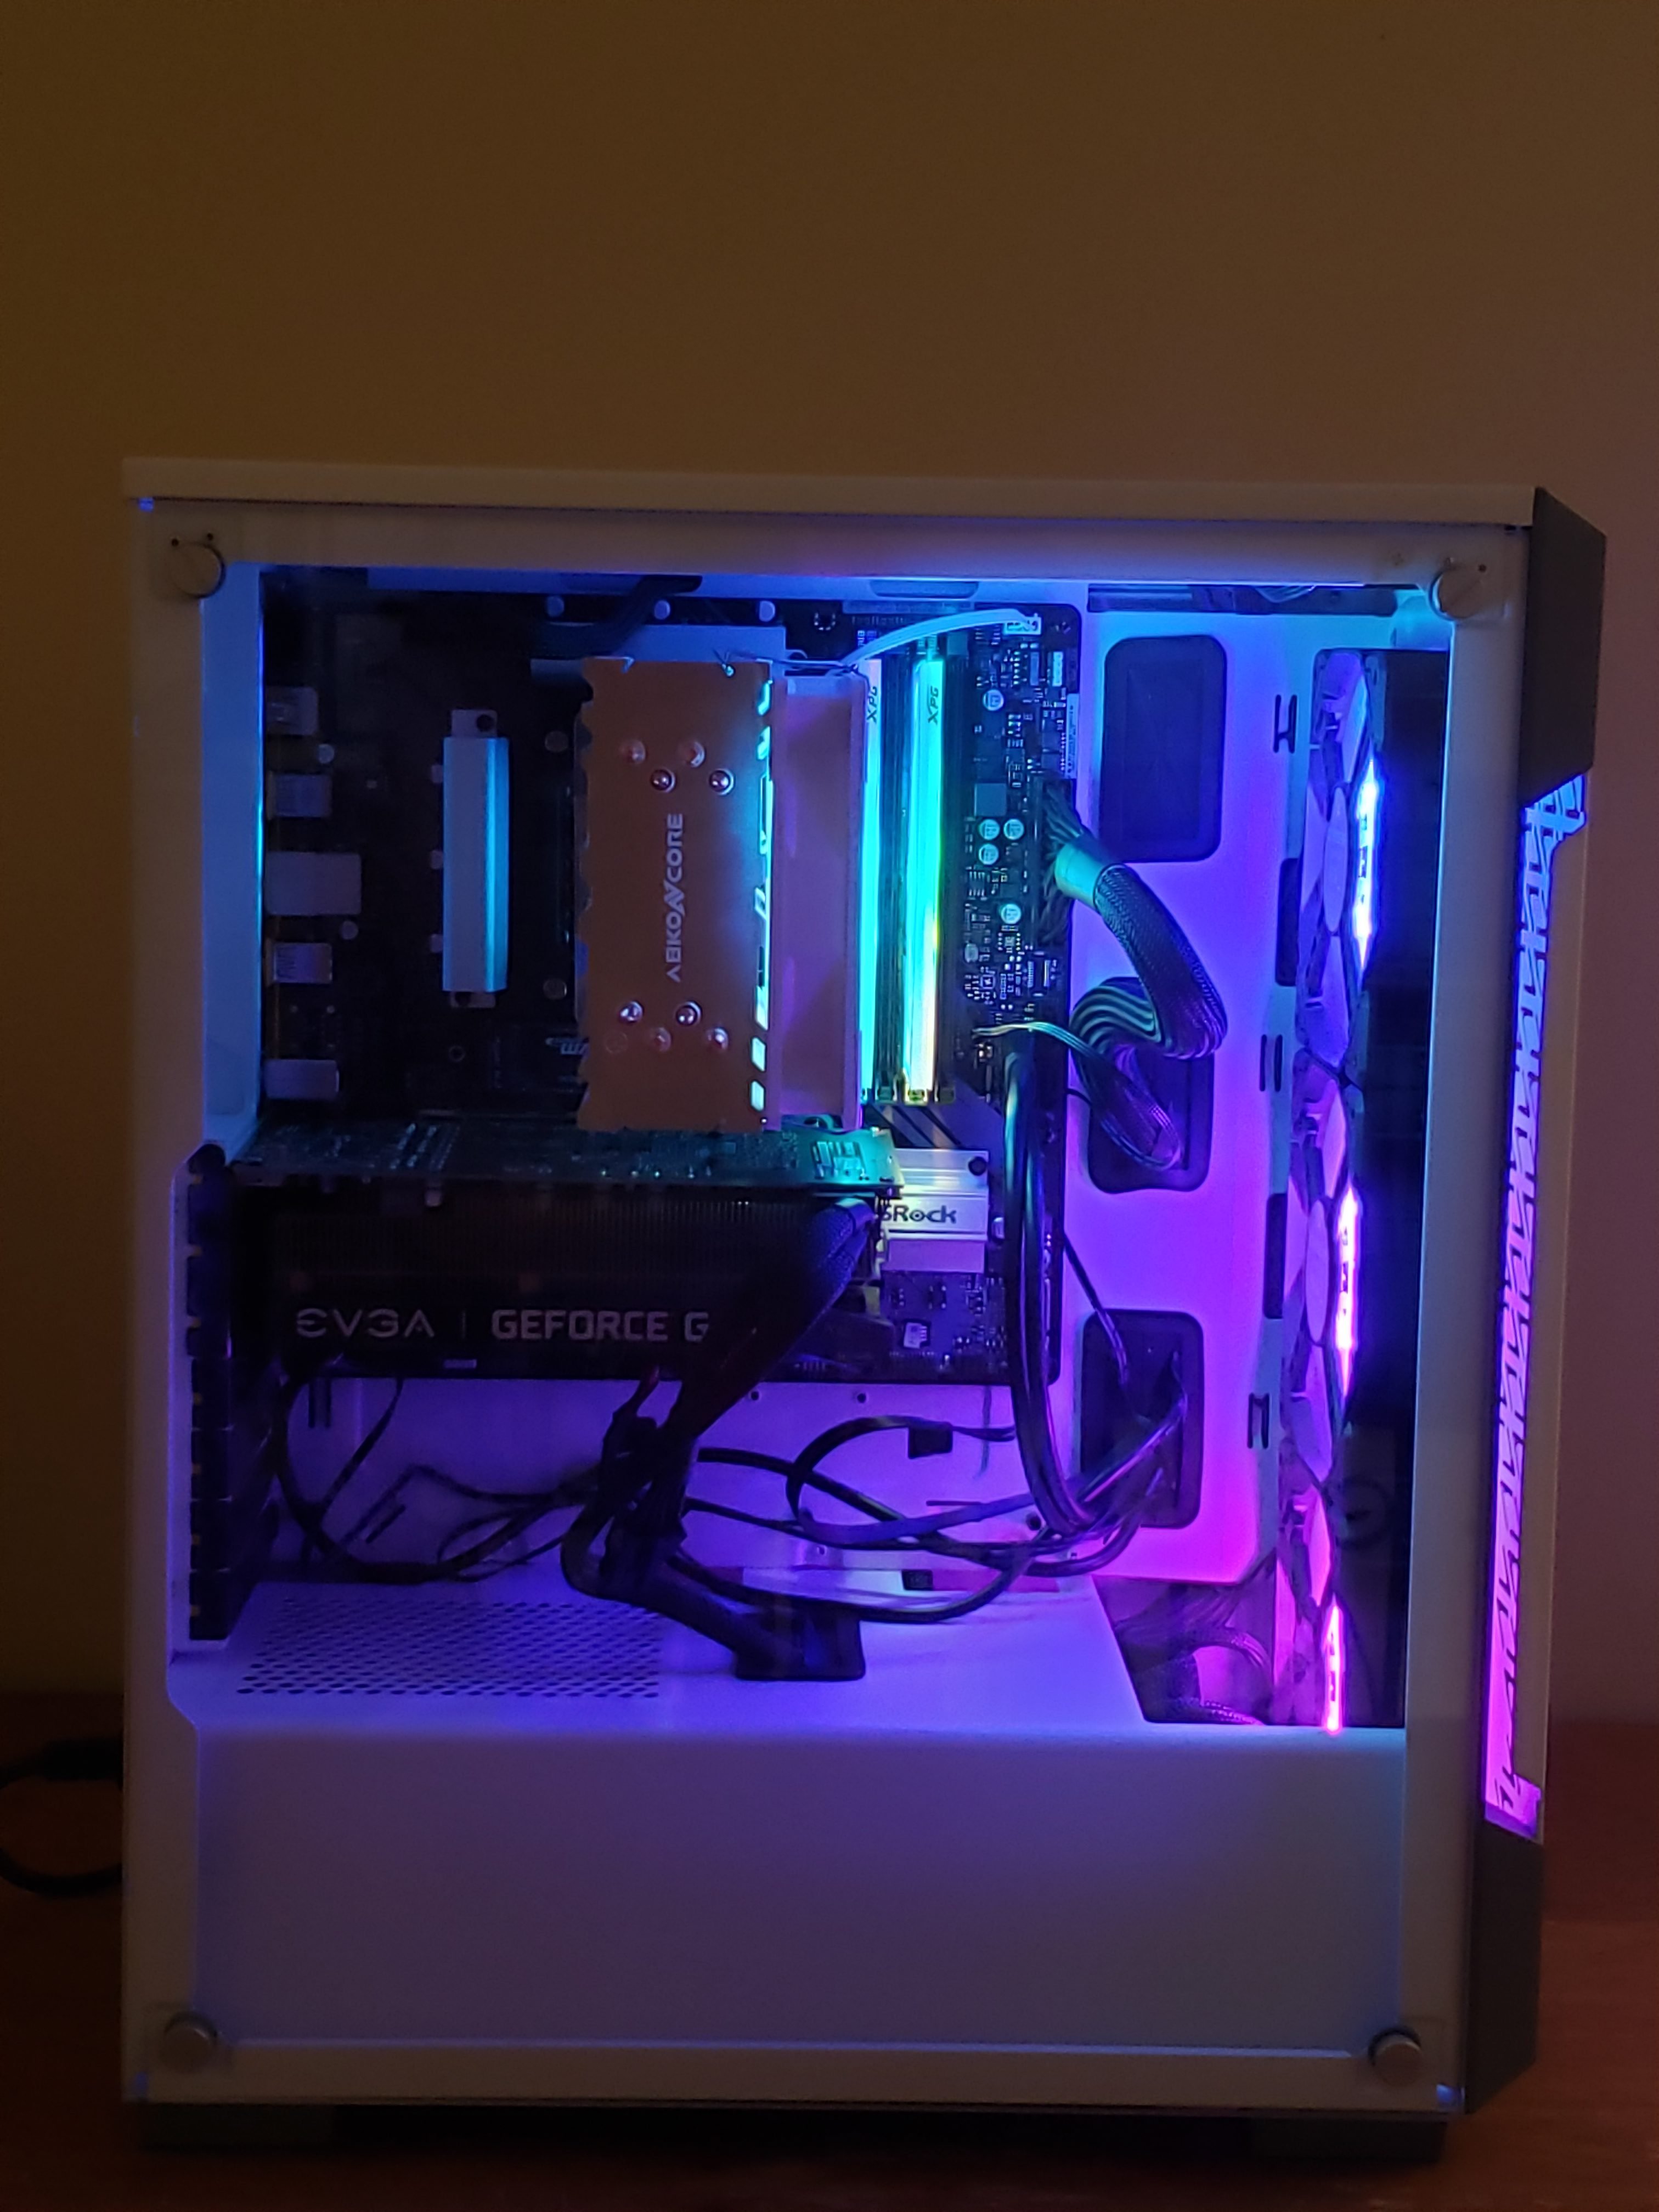
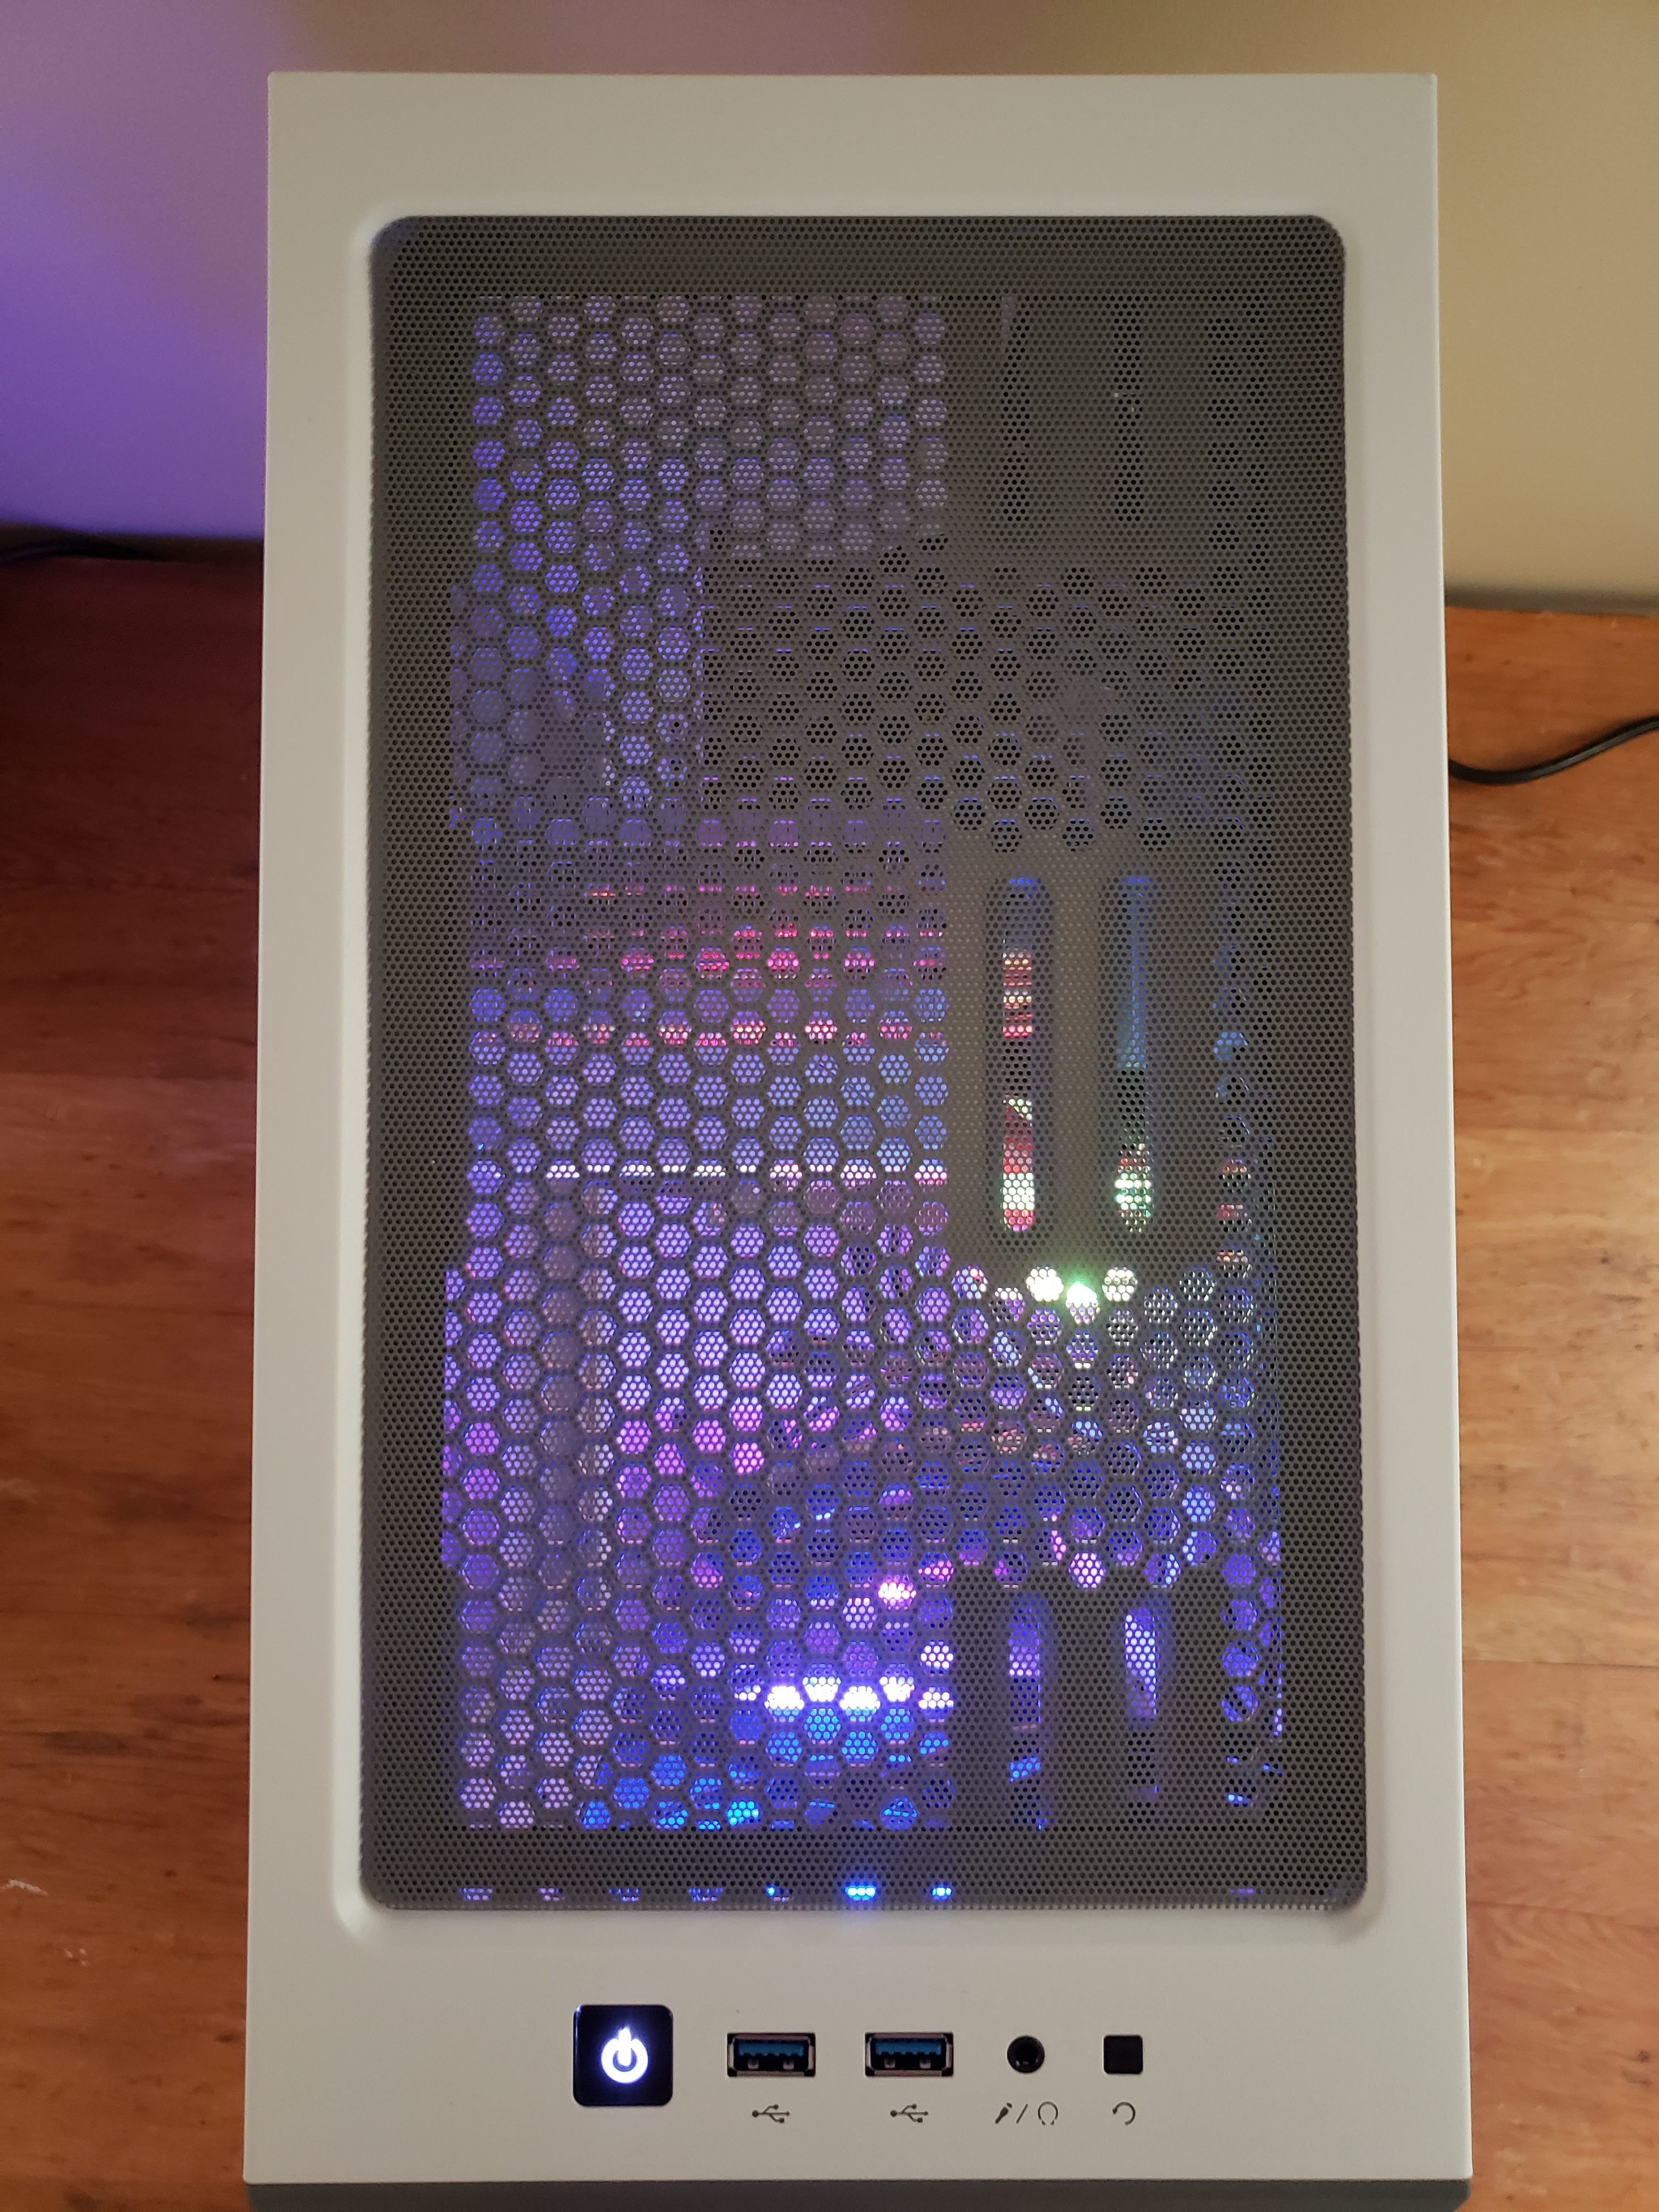
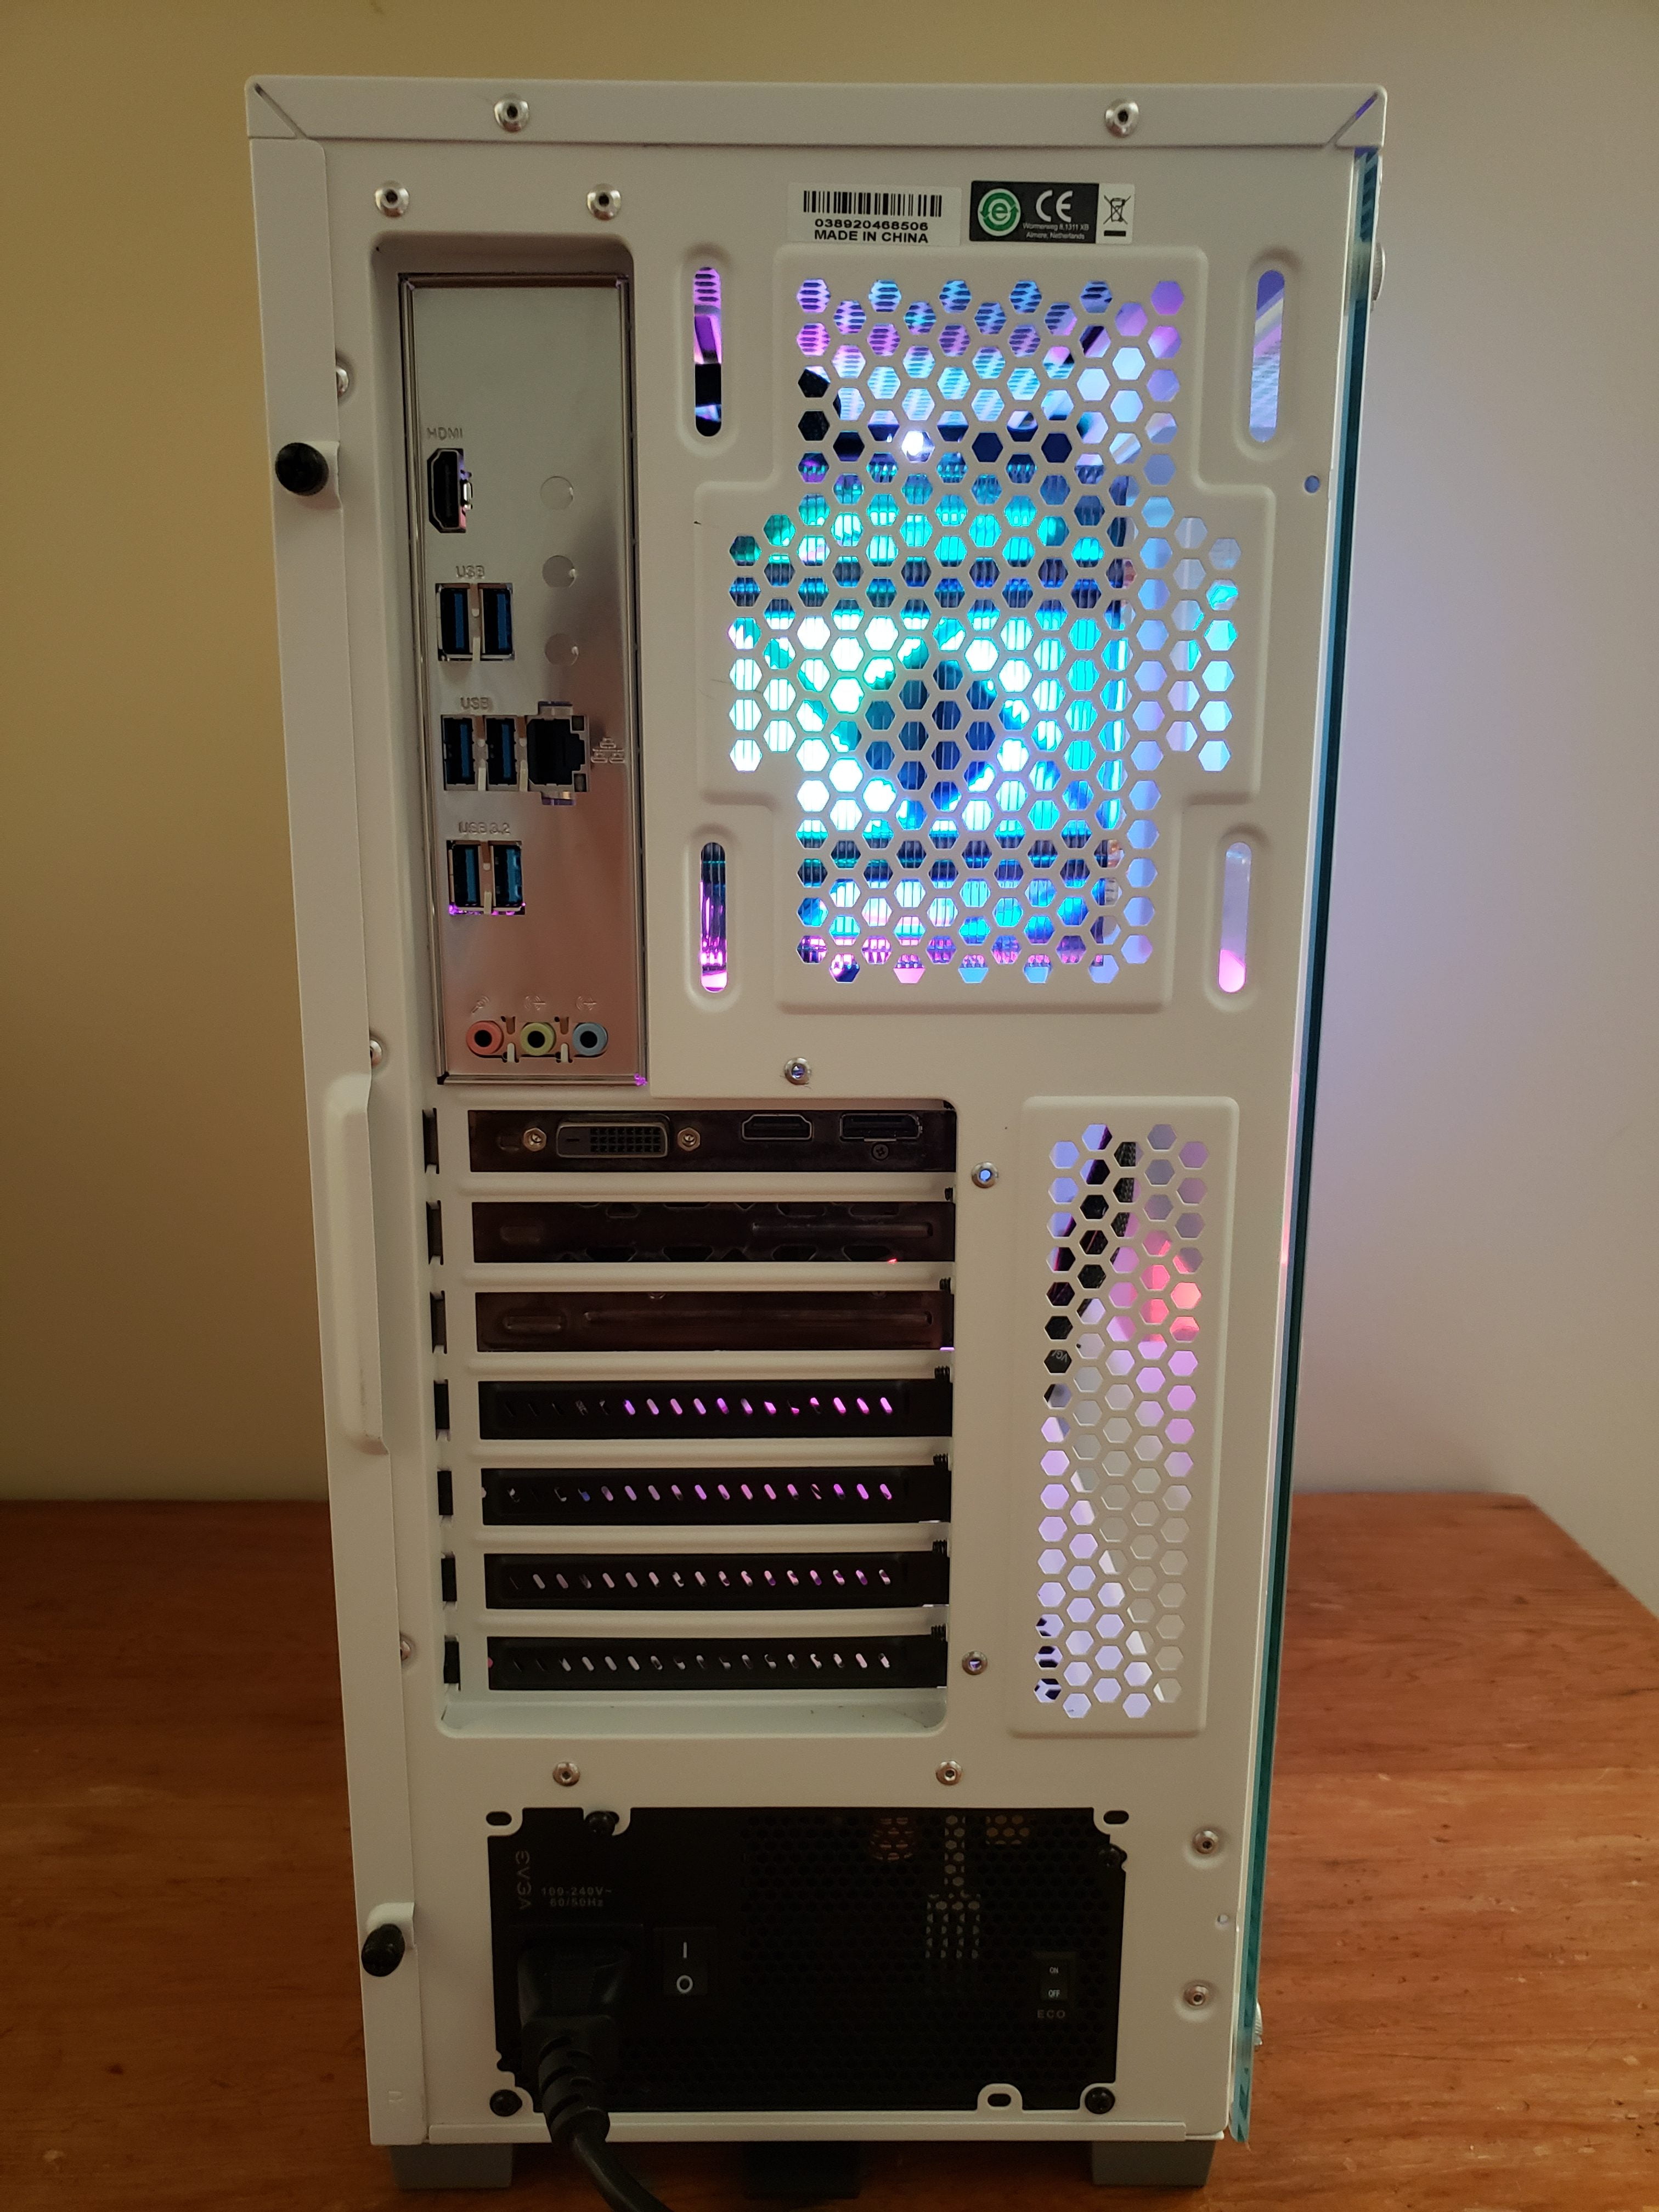
Photos:
Of course we have to open with some pictures of the finished product. Behold April’s Build of the Month, in all of her radiant beauty, as well as a short clip to better showcase the RGB lighting.


Graphics Card: GTX 1660 Ti
In continuing our trend of featuring relatively affordable graphics cards during the current GPU shortage, we selected the GTX 1660 Ti for April’s Build of the Month. The 1660 Ti is the best of Nvidia’s 16-series cards, and can reach respectable performance thresholds at 1080p. It struggles to push high framerates in higher resolutions or settings, but it’s a great all-around card and may be your best bet for an affordable GPU with 144FPS performance in most titles.
Processor: Core i5-11600K
A part of Intel’s newest 11th generation of CPUs, the 11600K is about as good as it gets in terms of gaming performance. Its 6 cores also offer very solid multitasking performance at a significantly lower price than its i7 and i9 counterparts. The 11600K is all you’ll need to push upwards of 240FPS in 1080p, and high framerates in 1440p and 4K (with a decent GPU, of course).
Additionally, the 11600K’s UHD 750 graphics (which come standard with any non-F Rocket Lake CPU) are powerful enough to get steady 60FPS in a decent proportion of popular titles, and 100+ FPS in games like VALORANT, CS:GO, and Minecraft, without a dedicated graphics card. For more information on this, check out our UHD 750 review and benchmarks.
CPU Cooler: ABKONCORE CT405W
Despite its misleading name, the ABKONCORE CT405W’s TDP is actually only 150W. This is still definitely adequate for the 11600K, but if you intend to overclock you may want to consider a more powerful cooling option like BeQuiet’s 250W Dark Rock Pro 4.
With our builds of the month, we strive to incorporate products we haven’t used before to discover non-name-brand components that are worth buying for various reasons. We are disappointed to say that this cooler does not fall into that category.
It is a bit cheaply made. The fan is held to the cooler with easily bent metal wires, which are incredibly difficult to remove. Even if you can remove them, it’s nearly impossible not to deform them, making it less than ideal when you go to clip the fan back on.
The reason this matters is that the cooler doesn’t really fit on the Z590M (the board’s power chokes get in the way). We got it to work, but it took some serious Jerry-rigging which included temporarily removing the fan. Additionally, the bracket is also cheap plastic, and the cooler’s overall design just isn’t that great.
That being said, the actual cooler performs fine. It kept our 11600K at low temperatures during benchmarks, so it’s not a total wash. As a $30 150W RGB cooler, the CT405W isn’t the absolute worst deal. It will perform well, but its poor design makes it a nightmare to install.
Based on this, we recommend BeQuiet’s 150W Pure Rock 2. If you prefer RGB, consider the Hyper 212 EVO RGB Black Edition, which also has an 150W TDP.
Motherboard: ASRock Z590M Phantom Gaming 4
One of the cheapest Z590 motherboards, ASRock’s Z590M packs all of the necessary features at a great price. It includes four RAM slots, an Ultra and Hyper M.2 slot, and maximum compatibility with Rocket Lake CPUs. It’s not overkill but it gets the job done, and does it well at that.
RAM: XPG Spectrix D60G DDR4 (2x8GB) 3200MHz
XPG may not be a brand you’re familiar with, but they can sure make some beautiful RAM. In this build we used the D60G model from their Spectrix line of RAM. Their dual channel 16GB 3200MHz kit is good, fast, low latency (CL16) RAM with a beautiful diamond design and RGB lighting. According to their website, over 60% of the surface is covered in lighting, which is more than any other RAM module available.
Storage: PNY CS3030 1TB
This is the second month in a row we’ve used PNY’s XLR8 CS3030 storage drive, with good reason. It’s really fast and really affordable.
The CS3030 has read speeds up to 3500 MB/s and write speeds up to 3000. This is currently as good as it gets at the CS3030’s price point. Aside from trying out faster PCIe Gen 4 drives, we’ll probably be using the CS3030 for most of our builds for the foreseeable future.
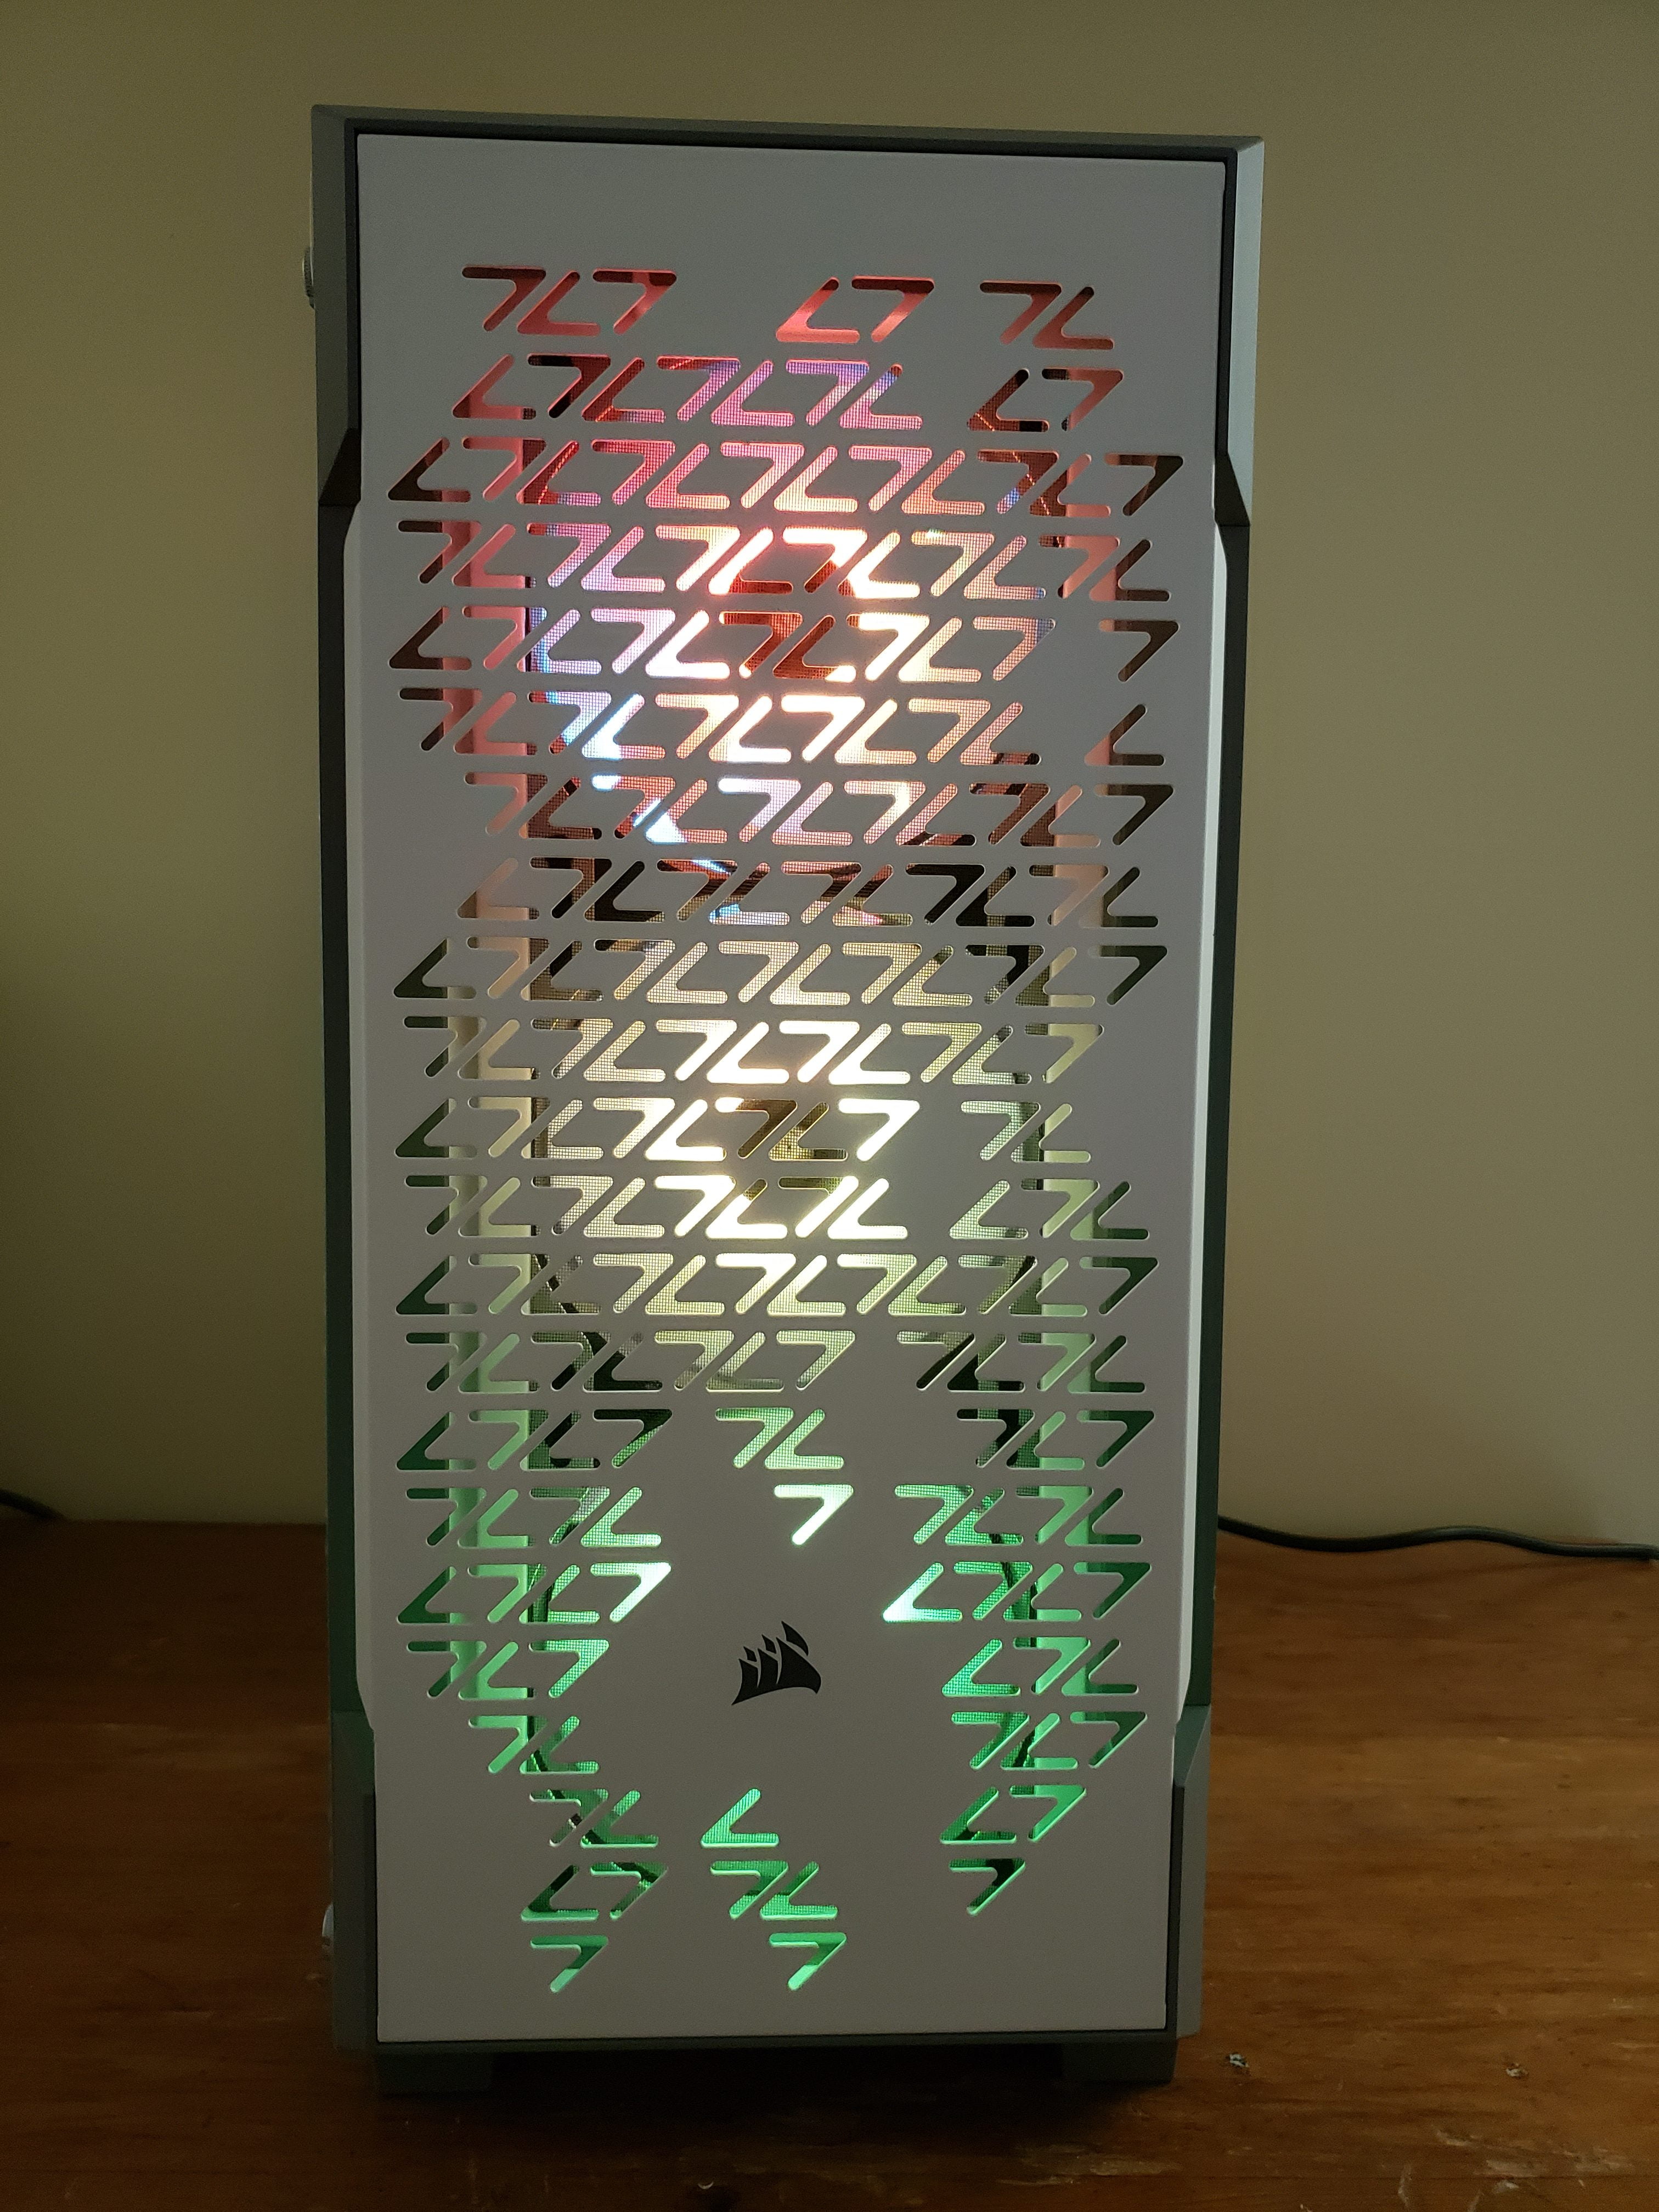
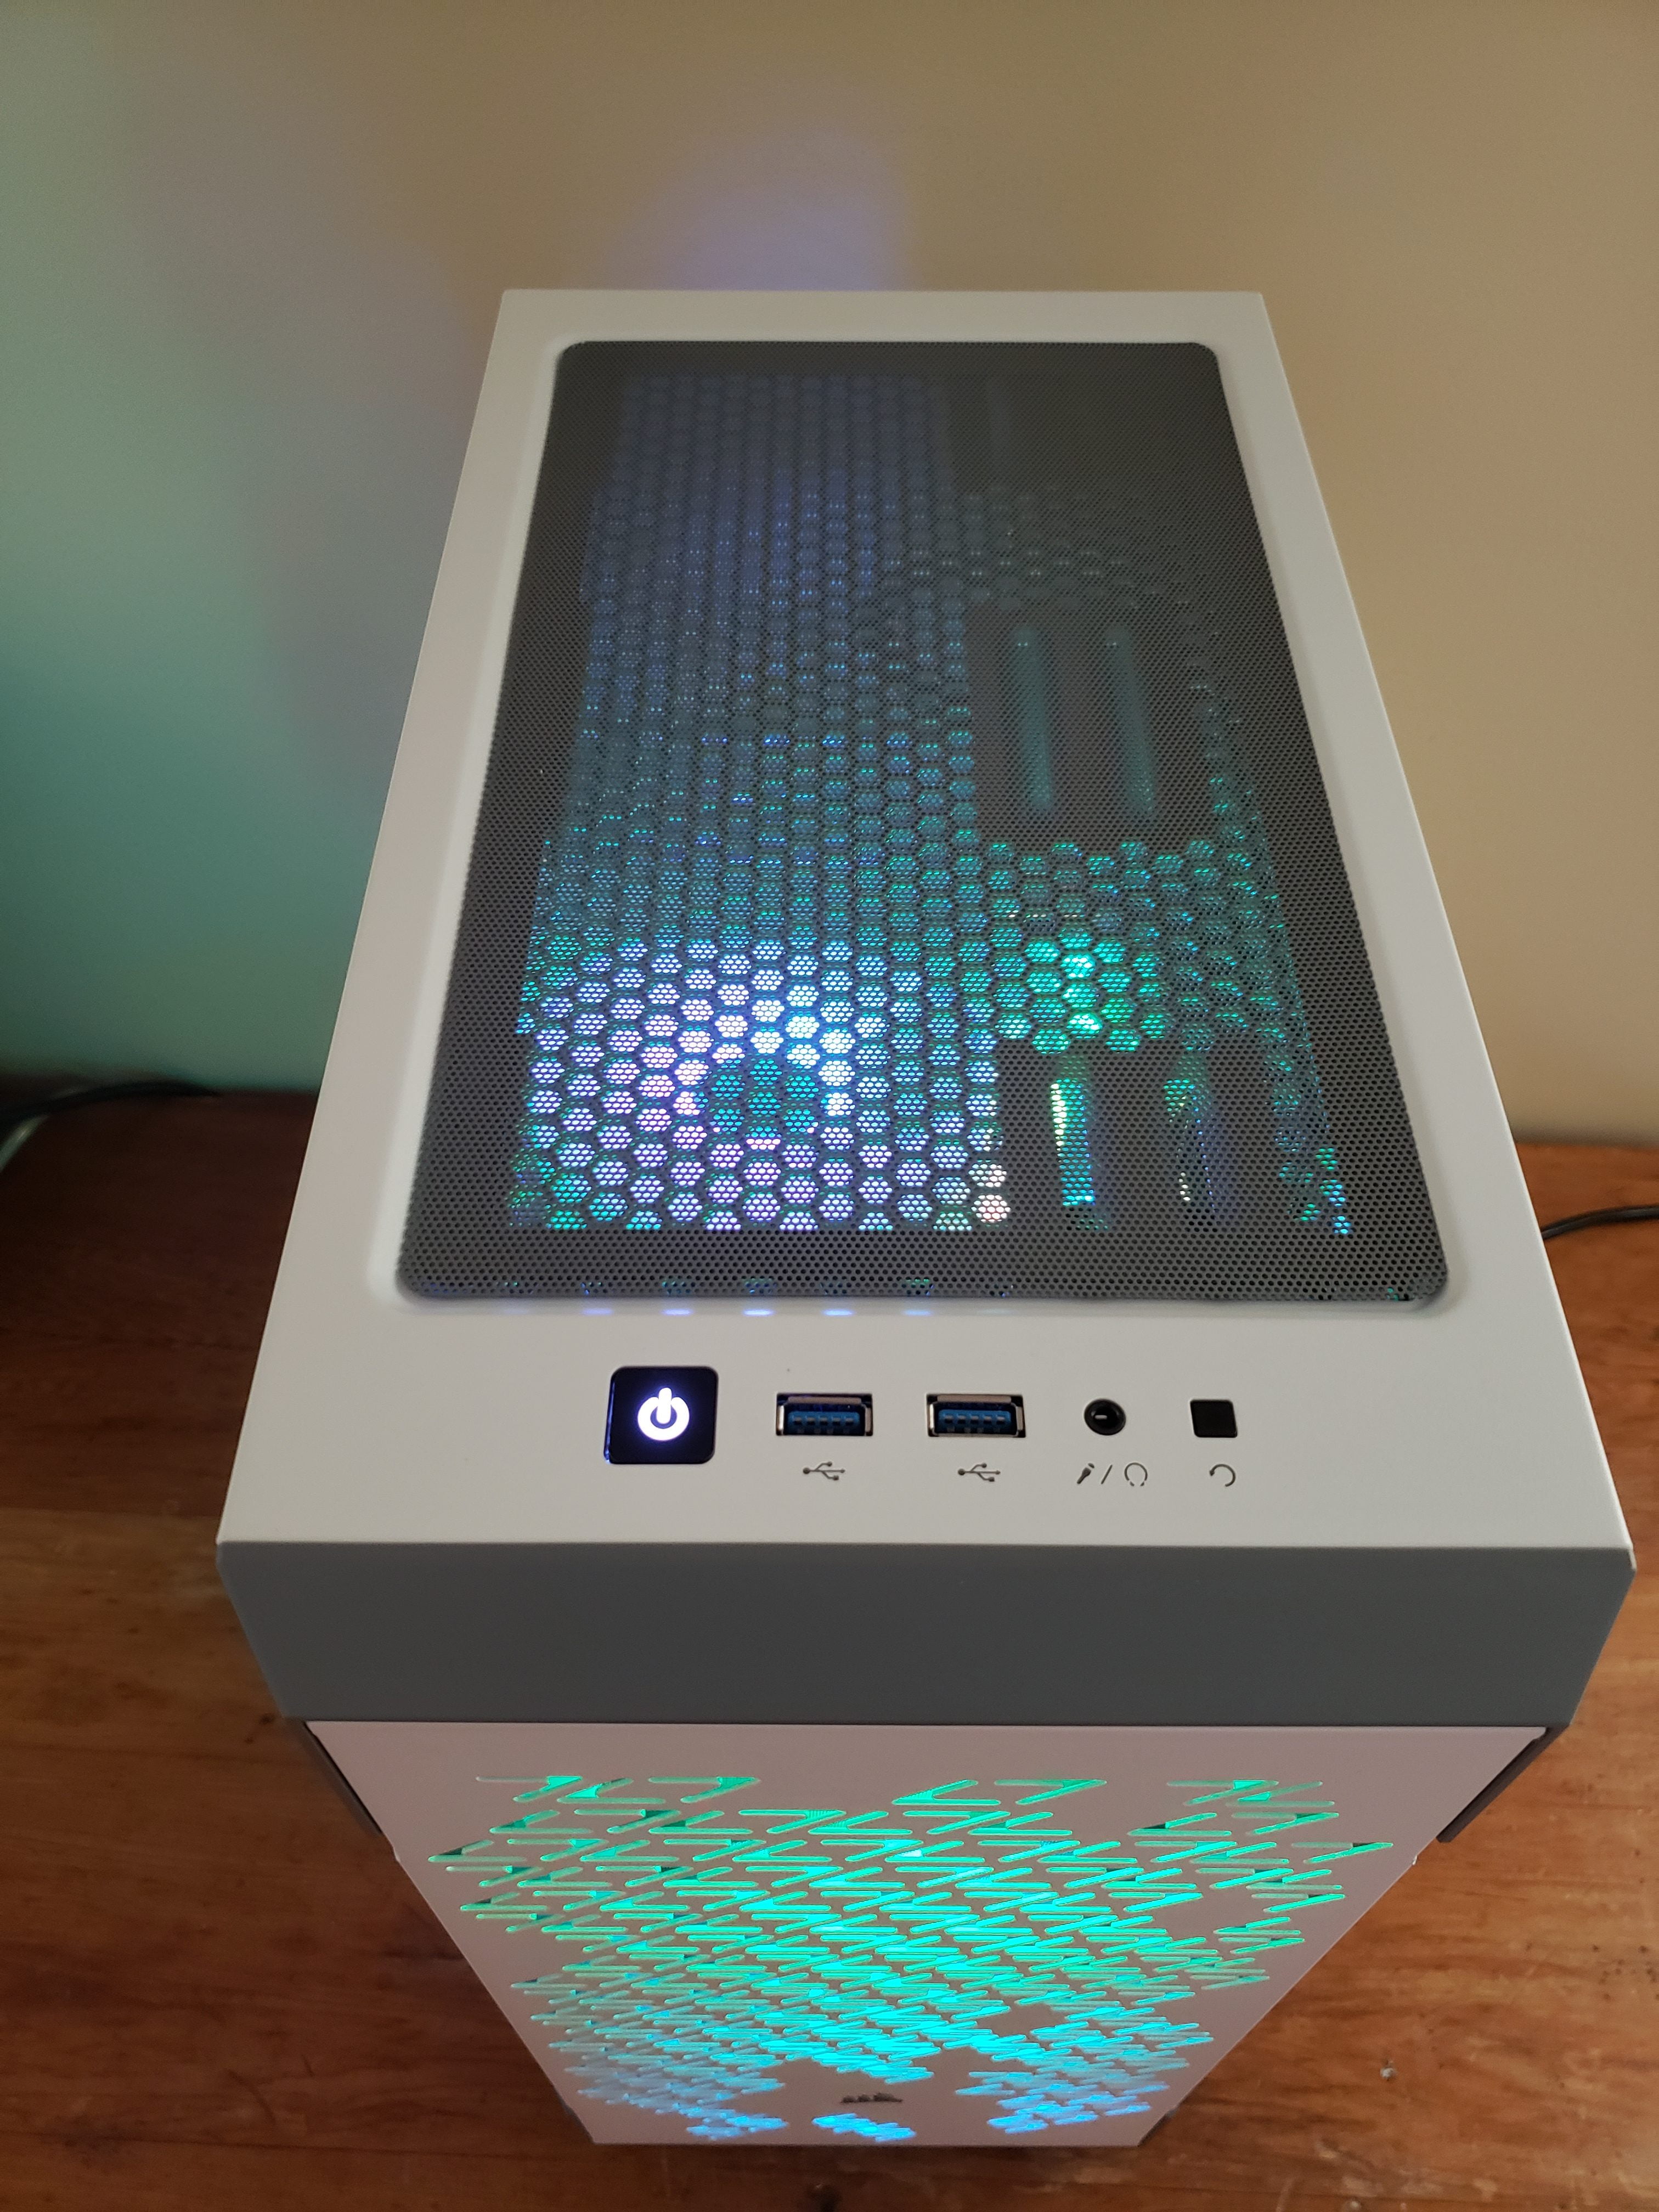
Case: Corsair iCue 220T
If we had to pick a favorite component from this build, it would probably be the 220T. We got it in white for this build of the month, since it looks really great with the RGB lighting, but it comes in black as well.
Speaking of RGB lighting, the Corsair iCue 220T has three customizable front case fans with accommodation for three more, if desired. The fans’ lighting shows through the perforations in the front panel, and the result is pretty awesome (you’ve probably already seen the photos).
The side panel is legitimate tempered glass, not acrylic, and there’s a bottom compartment that hides the power supply and a big portion of the cables. The 220T also includes rubber flaps through which you can thread the cables around the motherboard and below the graphics card, which allow for optimal cable management.
Our one complaint is that the bottom compartment is a little bit crowded. We opted to permanently remove the hard drive tray to make the power supply more accessible (it’s easily removable with four screws in the bottom and one inside the case), but if this isn’t an option for you it will be a tight squeeze. Even if you do intend on using it, consider temporarily uninstalling the drive tray, as it’s really easy to do and will save you some time.
Power Supply: EVGA 550 B5 (Fully Modular)
Another repeat component (we used it in March’s BOTM), EVGA’s 550 B5 is a good 550W PSU that’s pretty affordable. We like it because it’s fully modular, so there’s no extraneous cables floating around. Its 550W output is plenty for the 11600K, 1660 Ti, and the rest of the components.
Monitor: Dell S2421HGF
While this PC can definitely run some games at 240FPS, it’s designed primarily to run at 144FPS. As such, we selected an 144hz 1080p monitor for the official parts list, but we’ll include a recommended screen for 240FPS below.
The Dell S2421HF is a 24″ monitor with an ultra-low 1ms response time. Its features include adjustable height and tilt, FreeSync/G-Sync support, and 3 display ports (1 HDMI 1.0, 1 HDMI 2.0, and 1 DisplayPort).
For 240FPS: Acer XF250Q
If you’re looking to run games at 240FPS, we recommend the Acer XF250Q. It’s very similar to the S2421HGF in that it has a 1ms response time, adjustable tilt, and adjustable height (nearly 6″ in this instance). It also supports two HDMI ports (1.4 and 2.0), and one DisplayPort.
Benchmarks:
Below you can view this build of the month’s performance in several games in order to get a more exact idea of the kind of performance it can achieve.
All benchmarks are given in average FPS over an extended period of time. Keep this in mind so you can account for fluctuations; if a system averages exactly 144FPS uncapped, it will still experience stutters where it drops below this threshold.
Additionally, we optimized the PC’s settings to ensure maximum performance. It’s easy to do, just follow this guide.
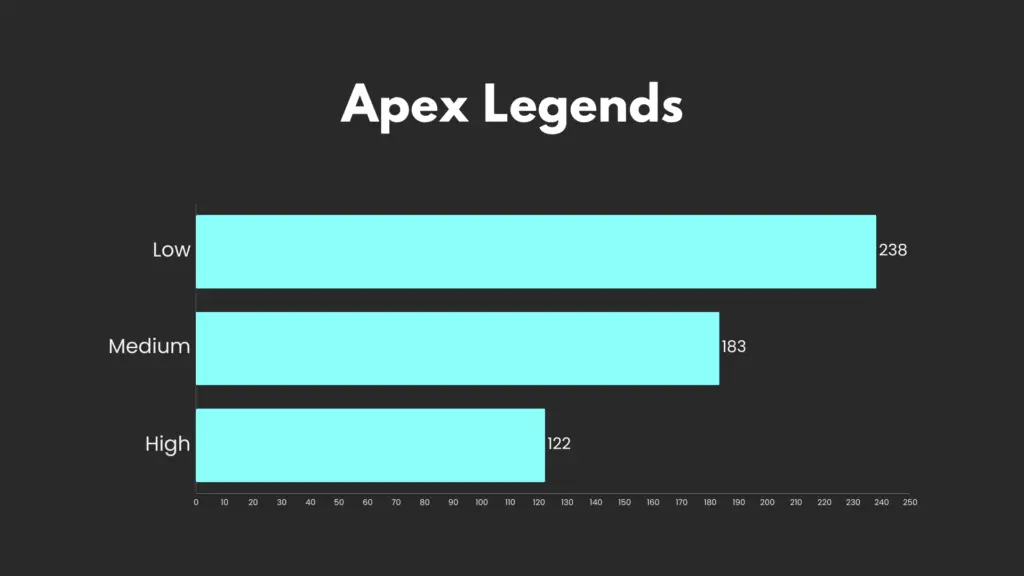
Apex Legends
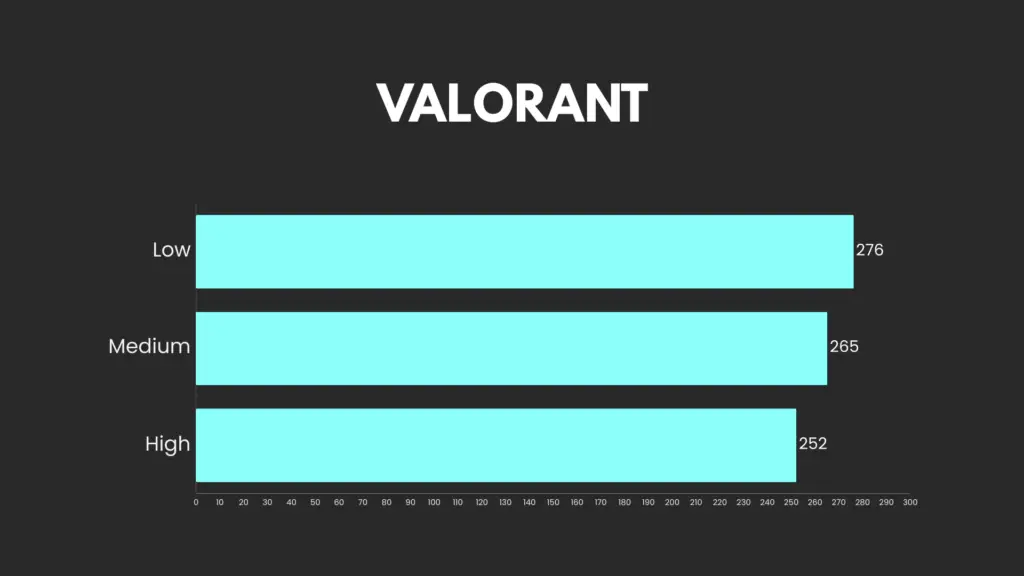
VALORANT
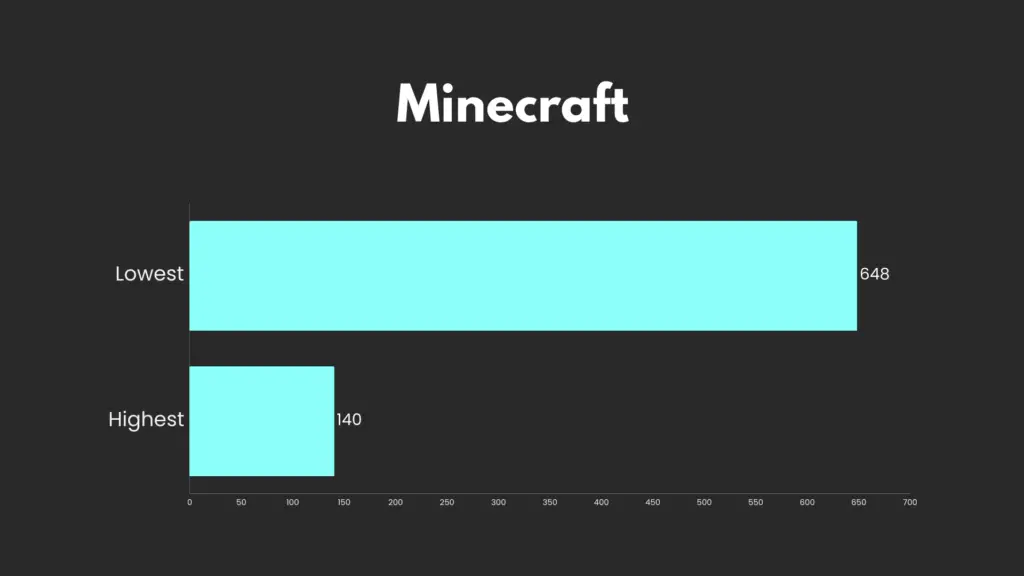
Minecraft
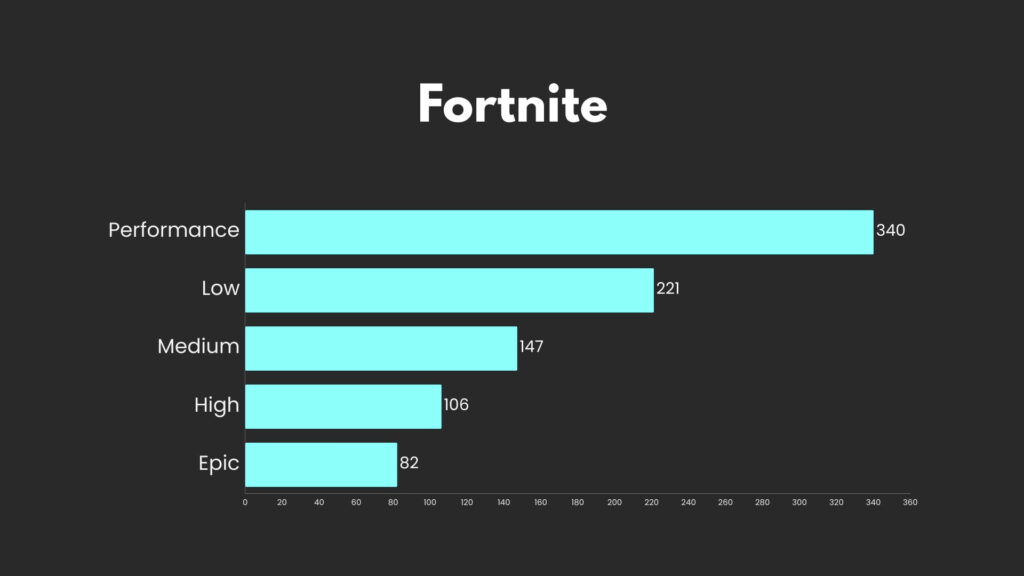
Fortnite
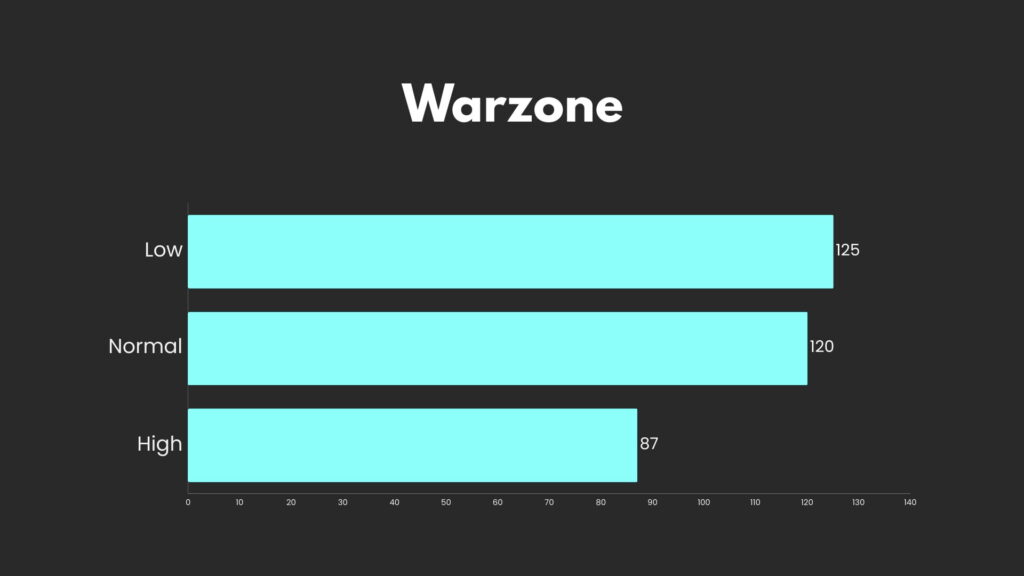
Warzone
Conclusion:
After building and testing this rig, we’re very satisfied with the results. In almost every instance, the 1660 Ti was the bottleneck on the system, and understandably so. The 11600K can hold its own against just about any CPU on the market in terms of gaming performance.
With that in mind, this build is definitely tailored towards those who intend to upgrade their graphics card at a later date. The 1660 Ti is more than enough for 144FPS gaming in almost any title and in games like VALORANT, CS:GO, and Minecraft you’ll be able to push past the 240 mark with ease, but to achieve those framerates in the most difficult games or with max settings you’ll need a more powerful GPU.
It’s also worth noting that in a small subset of games (one of which is unfortunately COD: Warzone), this build won’t be able to get consistent 144FPS. Warzone is one of the most GPU-intensive games available, so it’s understandable that a middle-of-the-pack card can’t hit the 144FPS mark. If you need steady 144 frames in Warzone, we’d recommend an RTX 2060 or better.
If you’re planning on sticking with the 1660 Ti for the foreseeable future, consider using the i5-11400 instead of the 11600K. It’s the best-performing CPUs available at its price point, and you’ll get roughly the same performance from it as the 11600K (since the GPU is the bottleneck in this system). Heck, even the i3-10100 is good for over 144FPS in the majority of games. We used it in March’s Build of the Month, so you can see some of its benchmarks there.
If you decide to try building this computer yourself (or even if you opt for a completely different rig) and don’t know where to start, feel free to check out our PC building beginner’s guide. It covers the entire computer-building process from start to finish, from the function of each part to part selection, assembly, OS installation, and troubleshooting. Either way, thanks for reading!
Art of PC is reader-supported. We may earn a commission if you make a purchase through our affiliate links, but it doesn’t cost you anything. We promise not to abuse this, and will not recommend a product if we don’t fully endorse it. Thanks for your support!